
Last updated: 11NOV2025 (see Changelog for details)
This is a general starter guide for MinUI, which runs a number of different handheld systems. I have a more in-depth MinUI guide specifically for the TrimUI Brick if you’d like to really get into the weeds; this guide mostly borrows from that one, and simplifies it along the way.
Table of Contents

Why MinUI?
Compatible devices
Set up the microSD card
Install MinUI
Add MinUI custom paks (optional)
Add BIOS files
Add game files
Game collections
Customize your systems
Create a custom boot logo
General MinUI tips
Box art Easter Egg
"Five Game Handheld"

Changelog
Why MinUI?
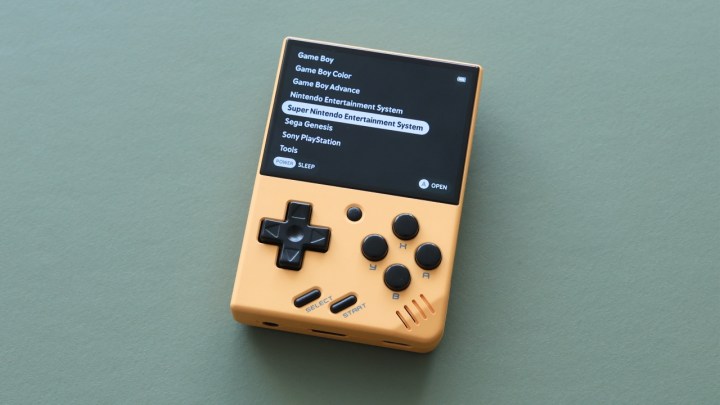
MinUI is a strikingly simple game launcher that was first developed in 2021 for the TrimUI Model S handheld. Made by developer Shaun Inman, it is meant to provide a focused game experience with no settings or configuration necessary.
Even though many of the handhelds that run MinUI are capable of playing more systems, MinUI is focused on classic retro systems. These are the officially supported consoles:
Default (BASE) consoles:
- Game Boy
- Game Boy Color
- Game Boy Advance
- Nintendo Entertainment System
- Super Nintendo Entertainment System
- Sega Genesis
- PlayStation
Optional (EXTRA) consoles:
- Neo Geo Pocket (and Color)
- Pico-8
- Pokémon mini
- Sega Game Gear
- Sega Master System
- Super Game Boy
- TurboGrafx-16 (and TurboGrafx-CD)
- Virtual Boy
When deciding whether to use MinUI, it’s best to consider what your gaming goals are: if you just want to get in and out of your games with minimal fuss, then this option is often the simplest. MinUI is the OS I install on (compatible) handhelds when I am gifting them to a friend, because I trust that they will intuitively know how to navigate its menu.
Compatible devices
There are a number of handhelds that work with MinUI:
Anbernic RG28xx
Anbernic RG34xx
Anbernic RG34xxSP
Anbernic RG35xx
Anbernic RG35xx Plus
Anbernic RG35xxH
Anbernic RG35xxSP
Anbernic RG40xxH
Anbernic RG40xxV
Anbernic RG CubeXX
GKD Pixel
M17
MagicX XU Mini M
MagicX Mini Zero 28
Miyoo A30
Miyoo Flip
Miyoo Mini
Miyoo Mini Flip
Miyoo Mini Plus
Powkiddy RGB30
Trimui Brick
Trimui Smart
Trimui Smart Pro
Note: if you are simply installing MinUI, this guide is not necessary. Each MinUI release comes with a readme file in its zip file, which will walk you through the installation process for your particular handheld. This guide is meant to expand on that readme file and provide additional options for this software. TLDR: read the manual!
Set up the microSD card
Setting up the card for MinUI is super easy. If you are using a microSD card that is larger than 32GB, it is recommended you format it to FAT32. If you are using a brand new SD card that is 32GB or smaller, you don’t have to do anything. If you are not using a brand new card, I recommend using SD Card Formatter to wipe the card beforehand, but after that you are good to go.
If you are using a card that is over 32GB in file size, here is how to format it to FAT32:
- Windows: download and install Rufus on your PC. The standard “rufus-4.6.exe” (the number will likely change) is fine. Insert your card and open Rufus, then select your card from the drop-down menu. Set the “Boot selection” to “Non bootable”, and set “File system” to FAT32. Under “Volume label” you can name the card, then press START and follow the prompts.
- Mac: Insert your card and open Disk Utility (it is pre-installed in MacOS). Select your microSD card, then select Erase. Give the card a name and under the “Format” option select “MS-DOS (FAT32)” and click Erase.
In general, I recommend the cards listed below, in order or preference. The prices fluctuate all the time, so keep an eye out for deals. If you are just going to play 8-bit and 16-bit era cartridge games, a 16GB or 32GB card will be plenty. A 128GB card will allow you to load EVERY 8-bit and 16-bit game out there, just about all of the arcade games that work, and quite a few PS1, TG-CD, and Sega CD games (those systems have the largest file sizes). A 256GB or 512GB card will allow you to store even more of those larger games, but is mostly overkill for a device running MinUI. I personally use a 64GB or 128GB card.
As far as model (“Extreme” vs “Ultra”, etc), this won’t matter when it comes to playing games. Some cards may transfer files more quickly (like when adding ROMs to the card), but the difference will be negligible. Instead, shop around for the best deal based on your desired amount of storage!
16GB cards:
SanDisk Ultra
SanDisk Industrial

32GB cards:
Samsung Pro Endurance
SanDisk Extreme

64GB cards:
Samsung Pro Endurance
SanDisk Extreme
128GB cards:
Samsung EVO Select
SanDisk Ultra

256GB microSD:
SanDisk Ultra
Samsung EVO Select
Samsung Pro Plus

512GB microSD:
SanDisk Ultra
Samsung EVO Select
Samsung Pro Plus
If you need a microSD card reader to plug into your PC, this one from Anker has never done me wrong for $15, and I also love this more fancy version with USB-C and USB-A connections.
Install MinUI
Now that your card is ready, we can download and install the requisite MinUI files.
Go to the MinUI website and download the latest releases — both the BASE and EXTRAS zip files listed in the “Assets” section of the release. Unzip both zip files and place the extracted files into the root (base) directory of your microSD card as specified below:
- With the BASE zip file, move over the following folders and files:
- Bios (folder)
- MinUI.zip
- Roms (folder)
- Saves (folder)
- XXXX (folder) – this is the folder specific to your device. It’ll be “miyoo” for the Miyoo Mini, as an example. Consult the package’s readme file for specifics related to your handheld!
- With the EXTRAS zip file, just move over everything (minus the readme file). You may get prompted to merge similar folders, just click yes if that happens.
Add BIOS files
Now that you have added MinUI’s BASE and EXTRAS folders, we can start adding our game and BIOS files. Let’s start with BIOS files. These are necessary for certain systems to run properly, and have unique locations in MinUI. Here is a list of BIOS files and their locations within the MinUI file system. These BIOS files are case sensitive!
Note that like with ROM files, BIOS files are copyrighted, and you are on your own to source them.
Game Boy (boot logo): Bios > GB > gb_bios.bin
Game Boy Color (boot logo): Bios > GBC > gbc_bios.bin
Game Boy Advance (boot logo): Bios > GBA > gba_bios.bin
Sega CD: Bios > MD > bios_CD_E.bin, bios_CD_J.bin, and bios_CD_U.bin
Sony PlayStation: Bios > PS > psxonpsp660.bin
TurboGrafx CD: Bios > PCE > syscard3.pce
Famicom Disk System: Bios > FC > disksys.rom
Pokemon Mini: Bios > PKM > bios.min
Super Game Boy: Bios > sgb.bios
Add game files
Adding game files is mostly straightforward: add the game files to the corresponding Roms folder on your SD card. So for example, add your Game Boy ROMs to the Roms > Game Boy (GB) folder on your microSD card.
Some tips and tricks:
- Only folders that have game files inside of them will appear in the MinUI menu, so it will have a nice clean experience.
- If you add files to any folder and then decide you don’t want them to actually appear in the MinUI menu, rather than deleting the files, you can add a “.disabled” extension to the end of the folder and it won’t appear. For example, if you have a bunch of games added to Game Boy (GB), you can just rename that folder to “Game Boy (GB).disabled” and it won’t show up in the menu. This can be especially handy if you want to have games appear in a Collection but not in the main menu.
- You can change the name of each folder to whatever you would like, as long as you keep the emulator association (in parenthesis) at the end of the folder name. So you could make a folder named either Sega Genesis (MD) or Sega Mega Drive (MD), whatever you prefer.
- If you want, you can make additional folders as long as they have the same emulator association in parenthesis at the end of the folder name. So you could have BOTH the Sega Genesis (MD) and Sega Mega Drive (MD) folders appear in the menu, if you wanted to separate your 16-bit Sega games by region.
- You can also change the names of the ROM folders without actually renaming them by creating a map.txt file in the root of the ROMs folder. Each line in the map.txt file should contain the real folder name followed by a tab, and then the name you want to display. Example: Game Boy (GB)→01) Game Boy (→ represents a tab character). (Thanks to pc77 on Reddit for the tip)
- You can consolidate similar systems into the same folder, as long as they use the same emulator core. For example, you can add Sega CD and Sega 32X games into your Sega Genesis (MD) folder, and all three systems will launch from the same menu. This is handy because I think MinUI is best when it is simple, and having a single Sega Genesis folder is a lot cleaner than having three total folders to scroll through.
- By default, the folders will appear in alphabetical order in MinUI, but you can customize the order by adding a number and closed parens (like “1)” and so on) at the start of the title. Here is a sample order that is not alphabetical, but actually grouped by manufacturer, release date, and console type:
0) Game Boy (GB)
1) Game Boy Color (GBC)
2) Game Boy Advance (GBA)
3) Nintendo Entertainment System (FC)
4) Super Nintendo Entertainment System (SFC)
5) Sega Genesis (MD)
…and so on.
Note that if you are going to have more than 10 systems (0 through 9), then you need to use a leading zero to accommodate double digits:
00) Game Boy (GB)
01) Game Boy Color (GBC)
02) Game Boy Advance (GBA)
03) Nintendo Entertainment System (FC)
04) Super Nintendo Entertainment System (SFC)
05) Sega Genesis (MD)
…and so on.
Game collections
MinUI supports Collections, which are simple and customizable text files.
To get started, created a folder named “Collections” in the root directory of your microSD card. Inside your Collections folder, add a txt file and name it whatever you would like. Open the txt file with a text editor like Notepad, and simply make a list of games and their paths. Here is an example of “Castlevanias.txt” from my collection:
/Roms/4) Nintendo Entertainment System (FC)/Castlevania (USA) (Rev A).nes
/Roms/4) Nintendo Entertainment System (FC)/Castlevania II – Simon’s Quest (USA).nes
/Roms/4) Nintendo Entertainment System (FC)/Castlevania III – Dracula’s Curse (USA).nes
/Roms/1) Game Boy (GB)/Castlevania – The Adventure (USA) (Castlevania Anniversary Collection).gb
/Roms/1) Game Boy (GB)/Castlevania II – Belmont’s Revenge (USA, Europe).gb
/Roms/1) Game Boy (GB)/Kid Dracula (Restored).gb
/Roms/5) Super Nintendo Entertainment System (SFC)/Super Castlevania IV (USA).sfc
/Roms/3) Game Boy Advance (GBA)/Castlevania – Aria of Sorrow (USA).gba
/Roms/3) Game Boy Advance (GBA)/Castlevania – Harmony of Dissonance (USA).gba
/Roms/7) TurboGrafx-16 (PCE)/Castlevania – Rondo of Blood (Japan) [T-En by Burnt Lasagna & Cubanraul v1.01] [n].chd
/Roms/8) Sony PlayStation (PS)/Castlevania – Symphony of the Night (QoL v1.2).chd
So you can see in this collection I have added the games in a mix of release and system order, starting with NES and going from there. I also added Kid Dracula since it feels like a spiritual successor to some of the older Castlevania games.
Some tricks and tips:
- If you make any changes to the game or directory names, it will break the connection. For example, if you change the number order of your ROM folders, you’ll have to change their path in each of your Collections too.
- You can add hidden games to your Collections, so that they only appear in the Collection and not in the main menu. Let’s say that I don’t want NES games to show up in my main menu, but I want to add a certain NES game to a collection, like Final Fantasy I. I can hide the NES folder by adding a “.disabled” extension to the folder name, and then add that full folder name to my collection, like this (in bold to make it easier to find):
/Roms/4) Nintendo Entertainment System (FC).disabled/Final Fantasy (USA).nes
/Roms/3) Game Boy Advance (GBA)/Final Fantasy I & II – Dawn of Souls (Rebalanced).gba
/Roms/3) Game Boy Advance (GBA)/Final Fantasy IV Advance (Restored).gba
/Roms/3) Game Boy Advance (GBA)/Final Fantasy V Advance (USA).gba
/Roms/5) Super Nintendo Entertainment System (SFC)/Final Fantasy VI (TWUE 3.06) + Bug Fixes & Add-Ons.sfc
/Roms/8) Sony PlayStation (PS)/Final Fantasy VII.pbp
/Roms/8) Sony PlayStation (PS)/Final Fantasy VIII.pbp
/Roms/8) Sony PlayStation (PS)/Final Fantasy IX.pbp
/Roms/8) Sony PlayStation (PS)/Final Fantasy Tactics (USA).chd
/Roms/1) Game Boy (GB)/Final Fantasy Adventure (World) (Collection of Mana).gb
/Roms/1) Game Boy (GB)/Final Fantasy Legend (USA).gb
/Roms/1) Game Boy (GB)/Final Fantasy Legend II (USA).gb
/Roms/1) Game Boy (GB)/Final Fantasy Legend III (USA).gb
If you’d like some help in getting started, here is a zip file of my own MinUI Collections (right-click and select “Save As”). Bear in mind that the ROM file names may not match yours, but it will give you an idea of some favorites.
Customize your systems
Now that we have all of our games added and everything organized, now we can start to play our games. But there are a few customizations we can do to enhance our play experience as well.
Let’s use Game Boy as our example.
- Start up a Game Boy game, then press the Menu button.
- Go to Options > Frontend, and choose the defaults for your system. They are already pre-configured by the MinUI developer, but you might want to adjust them yourself. For example, I prefer the following settings for GB:
- Screen Scaling: Aspect
- Screen Effect: Grid
- Screen Sharpness: Crisp (only applicable on some handhelds)
- CPU Speed: Powersave (only applicable on some handhelds)
- Debug HUD: Off
- Max FF Speed: 4x
- Now, go to Options > Emulator. Here you can make more adjustments, like GB Colorization, Color Correction, and more. Note that if you have added the BIOS file, you can go to Use Official Bootloader and set it to Enabled so you can see the boot logo when starting GB games.
- Next, under Options > Shortcuts, you can add hotkeys. Any spare button can be used (like the shoulder and trigger buttons, which didn’t exist on the GB), or you can press MENU + another button for a combo hotkey. Here are some examples:
- Save & Quit: MENU + START
- Cycle Effect: L2
- Toggle FF: R2
- Any time I press R2 I can toggle ON/OFF fast forward, and if I press MENU + START it will save and exit my game.
- Once you are done with adjusting the settings for your system, go to Options > Save Changes > Save for console. Now every Game Boy game will follow these same configurations.
- Go through each of the other systems and also set them up accordingly: your preferred scaling and CPU speed, any Emulator-specific settings, and your shortcuts; then just select “Save for console” and move on to the next one. This is a little tedious, but only has to be done once.
Create a custom boot logo
The EXTRAS file from MinUI contains a Boot logo tool; if you go into Tools and run the Bootlogo tool, by default it will replace the device’s boot logo with a MinUI boot logo. You can also make your own custom boot logo if you’d like, which I explain in my TrimUI Brick guide.
Note that after you run this tool, it will “self-destruct” and not appear again. To make it re-appear (like if you want to run the tool again with a new image), put the card back into your PC and go to Tools > (handheld folder) > Bootlogo.pak.disabled and remove the “.disabled” portion of the folder name.
In addition to the Bootlogo tool, you will find a tool named “Remove loading” in the Tools menu. This will remove the “loading screen” when launching the system, so you can run this one time to have a cleaner experience.
General MinUI tips
When actually using MinUI, here are some handy tips and tricks:
- Any time you are playing a game, you can press and hold the POWER button to create a Quicksave, and then next time you turn on the device it will resume where you were mid-game.
- Tap the POWER button to put the device to sleep. After a few minutes the device will auto-shutdown to conserve battery life. If you are in the middle of a game when you put it to sleep, it will save your game before powering off. For supported devices with a flip mechanism, closing the lid should put the device to sleep.
- If you don’t press anything for 30 seconds, MinUI will automatically put your device to sleep. Tap the POWER button to resume from sleep.
- If you want to start up a game from the menu that you’ve already made a save for, you can press the X button instead of A to launch the game and your save file at the same time. Otherwise, you can press A to start the game over from the beginning, or press the MENU button while in the game to load your last save state.
- To adjust brightness, press and hold the MENU button, then press Volume Up or Down.
Box art Easter Egg
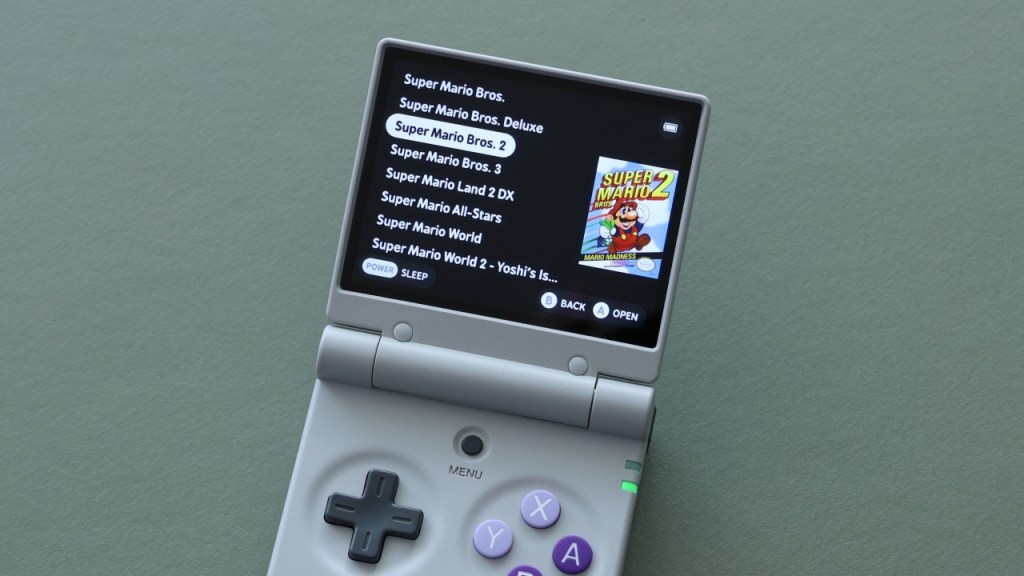
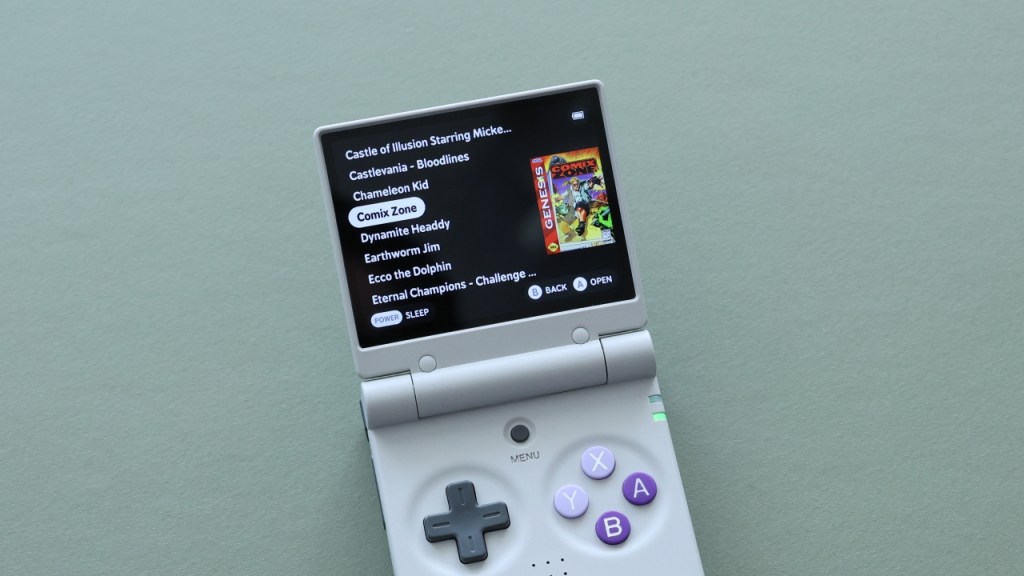
Yes, it is possible to add box art to MinUI (sort of). It’s not a supported feature on the OS, but something that was built into it at one point for the developer to make an easy navigation experience for children. Please note this is a labor-intensive process, and likely not great when using a single SD card between several different devices and resolutions. But if you are using your MinUI card on a single device, this could enhance your gameplay experience (and make it easier for non-readers to navigate).
Note that because this feature is unsupported, future updates to MinUI may break compatibility. You can read more about it here.
- Within each ROM folder, create a folder named “.res” (with a dot in front of it). In Windows you will get a prompt to confirm you are making a hidden folder, and on Mac it won’t let you even make that folder until you press CMD + SHIFT + “.” (period) to reveal hidden files first.
- Inside that folder, add PNG image files that correspond to the ROM file in the main ROM folder. This image file name needs to include the ROM’s file extension too. So for example, “Super Mario Bros 2.nes” will need an image named “Super Mario Bros 2.nes.png”.
- Images will need to be manually resized to look good on your screen. For the TrimUI Brick, I would recommend a width of 300px for each square and vertical box art image, and 350px for wide images (like the SNES box art). For 480p displays (like the Miyoo Flip pictured above), I would recommend a width of 200px for square/vertical and 250px for wide images.
To acquire boxart, I would recommend grabbing the images from Libretro’s thumbnail repository, since they are already in PNG format. Just bear in mind that you will need to resize and rename each of them to match your ROMs. If the game you are looking for isn’t present in the Libretro repo, then searching TheGamesDB may yield more results, but bear in mind that these are usually JPG files that will need to be converted to PNG.
Box art even carries over to Game Collections automatically, so your box art will appear there. In addition, you can make a “.res” folder within the main ROMs folder if you want console/system art (i.e. Game Boy, NES, SNES etc console art) and you can do the same for custom collections art (Super Marios, Castlevanias, etc).
“Five Game Handheld”
As humans, we often are drawn to excess. That can sometimes manifest in a gaming handheld, where we load it up with so many games that it becomes overwhelming, just because we can. This section will show you how to install a barebones, focused version of MinUI that will only show you a handful of games, and that’s it.
- Install MinUI (base and extras) on a (FAT32) microSD card following the instructions above.
- Add your ROM files to their corresponding folder on the microSD card. The fewer the better, I recommend five or six as the sweet spot.
- Go to SteamGridDB and download the box arts that correspond to your ROM files. Images must be in
pngfile format. - Resize the images using a tool like ImageResizer (or this one from RedKetchup) so that they are 200px in width for 480p displays, or 300px for higher resolution displays (TrimUI Brick). You can go up to 250px and 350px respectively but I think they cut off a little too much text in the menu.
- Place the images inside of a .res folder within each corresponding ROM folder, and rename the image so that it exactly matches the ROM file with extension. Example:
sdcard/Roms/Game Boy (GB)/.res/Tennis (World).gb.png - Download the latest release and unzip it, place the “Game View.pak” folder in your SD card’s Tools > (name of device) folder. Most of the folder names are intuitive, but others are challenging (hint: my282 = Miyoo A30, my355 = Miyoo Flip, tg5040 = TrimUI Brick).
- Put the card on your device, navigate to Tools > Game View and enable it. You can disable the setup by repeating this process.
- Optionally, put the card back into your PC and rename the Tools folder to something like Tools_off so that it won’t show in the menu.
You can get back to system view by re-running the Game View tool. And of course you can always add and remove games following the (slightly but deliberatey painful) process above.
Changelog
11NOV2025
– added “five game handheld” section
24OCT2025
– published guide

Re: Five Game Handheld
Great idea, challenge accepted. Except that I could only find three games that I really wanted to play at the moment. 🙂
Love the Game View PAK too, kudos to you and the other folks for putting that together and making it available.
It’s a shame that MinUI still has audio crackling issues on the Miyoo Mini Plus, otherwise it would be my full-time OS. But if I keep the volume down low I don’t seem to notice it as much. 😀
LikeLike
this is great and just in time!! i tried to get SpruceOS installed on my Miyoo flip but even talking to the dev on reddit couldnt get my custom themes to work kinda sad to go without retro acheivements but the simplicity is really nice and clean!! tyyy!!
LikeLike
Thanks for the Five Game guide, Russ, really great!
Quick question: is there a way to remove the “Recently played” entry in MinUI menu? You explain how to “remove” the Tools one, but I don’t think you’ve addressed the Recently Played 🙂
Thanks!
LikeLike
I haven’t tried it yet, but apparently you can disable Recently Played in MinUI by emptying the recent.txt file located in /.userdata/shared/.minui with a text editor (or by deleting it and creating an empty file with that name), and then setting it as read-only.
LikeLike
Okay scratch that, I tried setting recent.txt to read-only, both from Windows and from Linux, and it does not work. I assume that’s because 1) it’s a FAT32 filesystem, which does not have the same permissions data such as a standard Linux filesystem does, and/or 2) MinUI is likely running as root and can write to the file regardless.
I also tried formatting a micro SD card as exFat, and then ext4, and copied all of the MinUI stuff to it, but of course the Miyoo Mini Plus did not recognize it as a bootable device. I didn’t think that would work but it was worth a try.
One thought I just had would be to modify the launch script(s) to remove the recent.txt file after each emulator closes. Unless there is one single script that gets executed whenever an emulator closes.
This is going to take a bit more poking around…
LikeLike
Were you ever able to figure out how to remove the “Recently Played” entry permanently? I haven’t really seen discussion on this anywhere else
LikeLike
MinUI would be my all time favourite if I could just change the overlays to my preference, use better grids for GBA. Couldn’t manage to do it. Hopefully someone would point out how to do it someday.
LikeLike
It is interesting that I have “Recently played” on RG35XXSP but on MM+ there is no issue.
LikeLike
I’m struggling to add a new game after the initial load. There’s a new folder created called Roms_systems. I tried adding a game to Roms and Roms_systems, but it doesn’t show up.
LikeLike
I too have this problem and also cant seem to get the image files to work for box art. The folder structure is different than the video shows…
LikeLike
Hi! If you have disabled tools, enable it again, then go open your Trimui Brick, go to Tools>Gameview>disable Gameview
Then pull out the sd card, insert into your PC, your folders will look as it was in the initial setup. Gameview makes a new folder Roms_systems, then your roms will be out of the Roms folder and has been changed name added (*system*) for example (MD) if from Sega Genesis folder.
Just disable gameview and folders should return to normal. Hope this helps.
LikeLike
The box art piece didn’t quite work for me – oddly something moved my roms into their own folders in the roms directory, and the default system-level folders got moved to Roms_system. Thinking it’s possibly because I added enabled the gamepak before I was meant to
LikeLike
HI, I have followed your guide and set up 2 Miyoo Flips, and 1 Miyoo Mini Flip. Thank you!
For some reason I am having problems with a new mini flip I am currently setting up. I followed all the steps, and when I insert the card into the mini flip and turn it on, it gets to the “installing MinUI screen, and then suddenly it just goes to a black screen. The screen looks like it turns off, but the handheld is still powered and you can see the green power on light.
I can’t solve how to get this to work. I have tried multiple times and it doesn’t work. HELP PLEASE!
LikeLike