

Last updated: 10FEB2026 (see Changelog for details)
The Retroid Pocket handhelds are seemingly simple devices to set up — they run on Android, so how hard could it be? But it turns out there are some orientation quirks in setting up these handhelds; this guide is meant to take you from the very beginning of your journey with the device to the point of being a superstar.
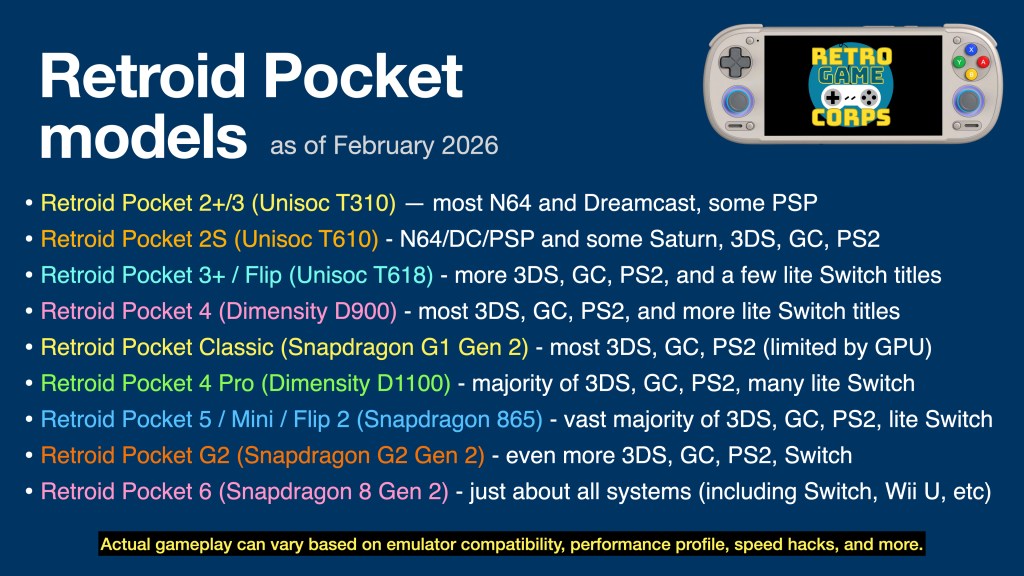
This guide will work for a number of Retroid Pocket devices. The major difference will be the performance for each, which can be summarized in the table below. This guide will be focused on the more recent Retroid Pocket releases, with notes for some older devices/CPUs.
I have video reviews for each device on my YouTube channel, which you can find either by checking out my Retroid Pocket playlist or the embedded videos below.
Are the Retroid Pocket devices pre-loaded with games? No, the devices ship as a general Android phone or tablet, with only essential apps (Play Store, Chrome, etc.) pre-installed. You are on your own to find the emulated game files (ROMs) to play on this device. There are no links to copyrighted files on this website.
Table of Contents

Where to buy
Recommended accessories
Prepare your ROM library
Initial setup and orientation
Install emulators and other apps
Turnip drivers
Updating your apps
Adding your games
Setting up RetroArch
Per-system recommendations
Consider a fancy frontend
Consider PC gaming
Game streaming
Sync your saves with Syncthing
Linux options
1080p overlays

Changelog
Where to buy
All models are sold directly via Retroid’s website. They also have official AliExpress and Amazon stores, but it will take longer for inventory to appear on those stores. The fastest way to get a new Retroid device will often be their website.
I would expect at least two weeks from the time of purchase to delivery, but that fulfillment may be delayed due to high demand. You can check their delivery dashboard to get a sense of what they are currently shipping.
Recommended accessories

I recommend using a card from reputable brands like SanDisk or Samsung for the most consistent experience. Other brands like Lexar, Silicon Power, and Microcenter also make nice microSD cards.
In general, I recommend the cards listed below. The prices fluctuate all the time, so keep an eye out for deals. A 128GB or 256GB card will allow you to load EVERY 8-bit and 16-bit game out there, just all of the arcade games that work, and quite a few CD-based games (those systems have the largest file sizes). A 512GB or 1TB card will allow you to store even more of those larger games.
128GB cards:
Samsung EVO Select
SanDisk Ultra

256GB cards:
Samsung EVO Plus
SanDisk Ultra


If you don’t have a nice microSD to USB adapter, you might want to think about getting one. This allows you to plug a microSD card into your computer to transfer files. A nice adapter like this one from Anker will give you the fastest transfer speeds possible, and can be used with USB-A or USB-C ports. Their USB-A version is also great.
Additionally, the Retroid Pocket devices double as a pseudo home console, thanks to its HDMI output function as well as the ability to connect to controllers via bluetooth or USB. The older Retroid handhelds had a micro HDMI port, so you will either want to grab a micro HDMI cable like this one from Amazon Basics, or a micro HDMI adapter to use with an existing cable. Starting with the Retroid Pocket 4 Pro, their devices provide video output via USB-C, so you would want to use one of these adapters or their USB dock. Note that the Retroid Pocket Classic handheld does not have video-out.

There are plenty of controller options out there, if you want to plug this into a TV. I prefer to use something that’s somewhat retro-friendly. You could use a bluetooth controller like the 8BitDo SN30 Pro, or a wired controller like the Betop BD2E. Note that in order to use a USB controller, you will also need an OTG adapter to plug the controller into the device’s USB-C port.
Prepare your ROM library
Since the Retroid Pocket devices can take a while to ship, I would recommend that you build your ROM library now, if you haven’t already.
Here is a general list of systems that can be played on the Retroid Pocket devices. For older Retroid handhelds (RP3+/Flip/2S), I recommend getting PAL region ROMs for PS2/GameCube, because they cap out at 50Hz which will give you better performance than struggling to reach the standard 60Hz found in NTSC region ROMs. The NTSC versions should be fine for the RP4/RP5 generations. ROM file sources will not be shared on this website.
Home Consoles:
Atari 2600, 5200, etc
Atari Jaguar
Colecovision
Panasonic 3DO
PC Engine (TurboGrafx-16)
PC Engine CD (TurboGrafx-CD)
NES / Famicom Disk System
Super Nintendo
Nintendo 64
Nintendo GameCube
Nintendo Wii
Nintendo Wii U
Sega Master System
Sega Genesis
Sega CD / 32X
Sega Saturn
Sega Dreamcast
Sony PlayStation
Sony PlayStation 2
Handheld Consoles:
Atari Lynx
Game & Watch
Nintendo Game Boy
Nintendo Game Boy Color
Nintendo Game Boy Advance
Nintendo DS
Nintendo 3DS
Nintendo Switch
Nintendo Virtual Boy
Sega Game Gear
Sony PSP
Neo-Geo Pocket / Color
Wonderswan / Color
Home Computers:
Amiga
Amstrad CPC
Atari ST
Commodore 64 (and C16/Plus4, C128)
Intellivision
MSX
PC (DOS)
ScummVM
ZX Spectrum
Arcade Systems:
MAME
Final Burn Neo
Neo-Geo / CD
Atomiswave
Naomi
When organizing ROM files, I recommend using the “No-Intro” naming convention, which is the standard naming used for ROM sets within RetroArch and other emulation communities. By using no-intro naming, you will be more likely to get box art automatically added when you load up your games in RetroArch or most frontends. If you have a question as to how a game should be named, I recommend checking out the Libretro thumbnails directory, which is what many emulators pull from for their media files. If your game name matches the thumbnail name found in this directory, chances are that it will properly download the media for it.
Compress your files: many disc-based systems have file types that can be compressed into a single, smaller file. This will save space on your microSD card! Here is my guide on how to compress some of the most popular game files:
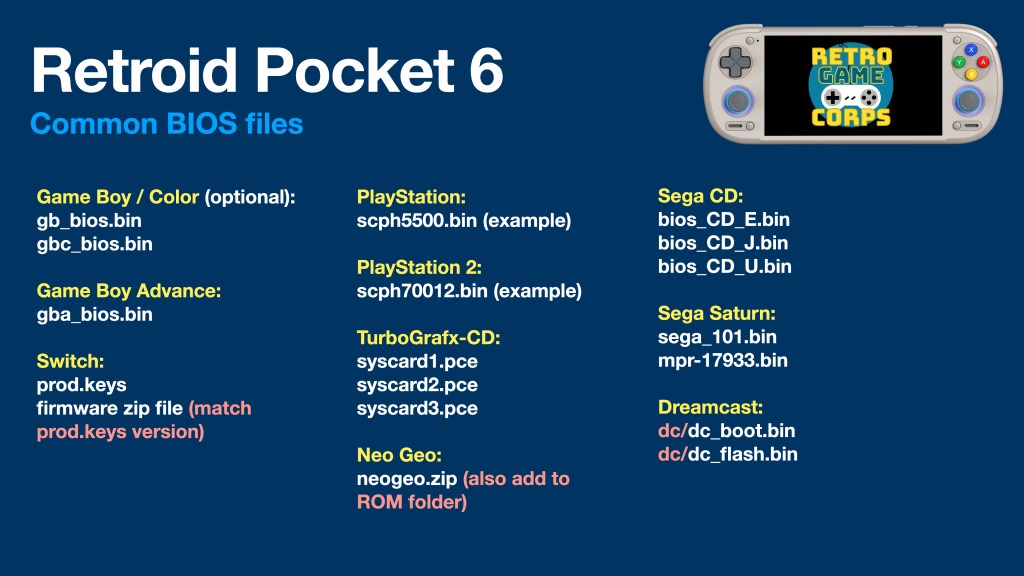
An important component of your ROM library is maintaining BIOS files. BIOS files are system files necessary for some emulators (GBA, Sega CD, or PS1/PS2), and are helpful in improving accuracy with other systems. These files are also copyrighted. Note that PS2 BIOS files can be easily extracted from the PS3 firmware file following my guide. Here is more information about BIOS files.
Recommended BIOS files:

GAME BOY / COLOR:
gb_bios.bin
gbc_bios.bin

GAME BOY ADVANCE:
gba_bios.bin

SWITCH:
prod.keys
firmware zip file (match prod.keys version)

PLAYSTATION 1 (many options!):
scph5501.bin

PLAYSTATION 2 (many options!):
scph70012.bin

PS VITA:
PSP2UPDAT.PUP
PSVUPDAT.PUP
SEGA CD:
bios_CD_E.bin
bios_CD_J.bin
bios_CD_U.bin

SATURN:
sega_101.bin
mpr-17933.bin

DREAMCAST:
dc/dc_boot.bin
dc/dc_flash.bin

NEO GEO (also place in Neo Geo ROM folder):
neogeo.zip

TURBOGRAFX-CD:
syscard1.pce
syscard2.pce
syscard3.pce
Community compatibility sheets: if you want to see how specific games run on any older Retroid device, I would recommend checking out its corresponding community compatibility sheet. This will also provide tips and tricks to get the best performance for each game too, so if you are struggling with any certain game/emulator, this will be an excellent resource.
Retroid Pocket 2+/3
Retroid Pocket 2S
Retroid Pocket 3+/Flip
Retroid Pocket 4 (Odin Lite sheet, same processor)
Retroid Pocket 4 Pro
Retroid Pocket 5 (Retro Ryan’s site has best settings)
Initial setup and orientation
When it comes to initial setup, the setup process will generally be the same, since these are all Android devices. We’re going to focus on the Retroid Pocket 6 in this guide but it will apply to the other devices. The general process is to:
- Set up Android
- Install apps via the Play Store
- Side-load apps via Obtanium
- Add games and BIOS files
- Configure each emulator
- Tie everything together with a frontend
Let’s take it one step at a time, with setting up Android first.

When first starting your Retroid device, it will have you go through some initial setup for WiFi, time zone, etc. There is also a screen that will pre-install emulators and apps for you — I recommend skipping most of these because we are going to install our own (more recently updated) versions in a moment. However, if trying to run GameCube on the Retroid Pocket 3+/2S, I recommend installing the “Dolphin for Handheld” emulator that can be pre-installed on your device during the initial setup. This app provides an excellent mix of accuracy and performance, and allows for easy adjustment of the resolution to below-native figures.
Once you have gone through the first setup screens, I recommend restarting the device once before going further. Once you have restarted, go to Settings > System > Updates and run a system update so you are using the most recent version of the Retroid image. Then, you can go into Settings > Handheld Settings and adjust them as shown in the guide video.
I recommend the Xbox ABXY button layout since it will work natively with Android games and streaming apps. While in the Settings menu, also go to Display > Screen timeout and change the timeout from 1 minute of inactivity to something more reasonable (I personally set mine to 30 minutes), and turn off notifications by enabling “Do Not Disturb” mode. Finally, within the Security settings you can disable the need to swipe the screen every time you wake the device from sleep.
Remove the white bar: when playing games, you will see a faint white bar on the right side of the screen. This is a menu bar that you can swipe from the right to access things like the Key Mapper tool or adjust the screen brightness on the fly. If you would like to disable this, swipe down from the top of the screen and turn OFF the “Floating Icon” option. Note that this will disable the right menu bar (and those handy functions) as well.
Sleep mode: The Retroid Pocket devices can enter sleep mode by tapping the POWER button, much like a tablet or phone. And like with a tablet or phone, you could simply leave this device in sleep mode when not using it, and it will slowly discharge over the period of a week or two. However, if you are playing the device frequently (like every day or a few times a week), I recommend just keeping it in sleep mode and charging it as needed, like you would a phone. Powering on the device takes quite a bit of time, which can add up if you play the device often. When not using the device for an extended period of time, be sure to fully power it down.
Install emulators and other apps
The process for installing apps is simple: grab what you can from the Play Store, then load the rest yourself using an app called Obtainium. You can actually install just about everything you need from Obtainium without having to use the Play Store. Here are individual links to most of the common apps you’ll need:
RetroArch (Aarch64 version) -- classic systems
Duckstation (free, Play Store) -- PS1
Mupen64Plus FZ (Pro version, Play Store) -- N64
Redream (free, in-app upgrade, Play Store) -- Dreamcast
Yaba Sanshiro 2 (Pro version, Play Store) -- Saturn
PPSSPP (Gold version) -- PSP
Dolphin (latest build) -- GameCube & Wii
Dolphin forks -- GameCube & Wii
NetherSX2 Classic (see note below) -- PS2
MelonDS -- Nintendo DS
Azahar -- 3DS
Citra MMJ -- 3DS (low powered devices)
Vita3k -- PS Vita
Cemu -- Wii U
Eden -- Switch

Streaming apps:
NVIDIA GeForce Now (PC cloud streaming)
Shadow PC (PC cloud streaming)
Moonlight (PC remote play)
AMD Link (PC remote play)
Steam Link (PC remote play)
Parsec (PC remote play)
PXPlay or Chiaki (PS4 & PS5 remote play)
XBXPlay (Xbox remote play)

PC gaming:
GameHub -- Windows/Steam
GameHub Lite -- Windows/Steam (no login required)
GameNative -- Windows/Steam/GOG/Epic
Winlator -- Windows

Other apps:
Syncthing-Fork (free) -- save syncing (guide)
Apps that are not in the Play Store have to be downloaded manually and then side-loaded, which simply means you install them yourself. It’s an easy process. You can do this manually, by navigating to this guide on your Retroid’s web browser, then tapping on each link above to go to the download page for that app. Once downloaded, find the app in your Downloads folder, tap on it, and it will install.

My preferred way to side-load apps is Obtainium. This app will check the app versions on your device, and notify you when a new version is available, and you can update that app directly within Obtainium too. There is also a handy update script that will auto pull the apps for you into Obtainium.
To get started, download the latest Obtanium release (the “app-release.apk” version) and install it on your device. Next, download the latest Emulation Pack json script and save it you your device. Open Obtanium, tap on “import/export” then “Obtanium import” and find the json file you downloaded. It will show you a list of emulators you can download and install — choose one, then tap on the “install” button at the bottom of that screen; repeat for other apps as needed.
| RP2+/3 | RP3+/Flip/RP2S | RP4/Pro | RP5/Mini/Flip 2 | RP6 | |
| Retro systems | RetroArch | RetroArch | RetroArch | RetroArch | RetroArch |
| PSX | DuckStation | DuckStation | DuckStation | DuckStation | DuckStation |
| N64 | Mupen64Plus FZ | Mupen64Plus FZ | Mupen64Plus FZ | Mupen64Plus FZ | RetroArch |
| Saturn | Yabasanshiro 2 | Yabasanshiro 2 | Yabasanshiro 2 | RetroArch | RetroArch |
| Dreamcast | Redream | Redream | RetroArch | RetroArch | RetroArch |
| NDS | MelonDS | MelonDS | MelonDS | MelonDS | MelonDS |
| N3DS | Citra MMJ | Citra MMJ | Azahar | Azahar | Azahar |
| PSP | PPSSPP | PPSSPP | PPSSPP | PPSSPP | PPSSPP |
| PS Vita | N/A | N/A | Vita3k | Vita3k | Vita3k |
| PS2 | N/A | NetherSX2 3668 | NetherSX2 3668 | NetherSX2 3668 | NetherSX2 3668 |
| GameCube | N/A | Dolphin forks | Dolphin | Dolphin | Dolphin |
| Wii | N/A | Dolphin forks | Dolphin | Dolphin | Dolphin |
| Wii U | N/A | N/A | N/A | Cemu | Cemu |
| Switch | N/A | N/A | Yuzu (Android 10 build) | Eden Legacy | Eden |
Individual app recommendations:
For RetroArch, I strongly recommend going through my RetroArch Starter Guide to orient you to the platform itself. I consider this to be a necessary part of the process when it comes to mastering emulation on an Android device, particularly for retro games. It has a learning curve to it, but once you get the hang of it, you can use these skills for a variety of devices that use RetroArch. The Retroid starter guide video will show you the very basics to get started.
Regarding Dolphin (GameCube and Wii), most games will run well at a 2x (RP4/Pro) or 3x (RP5/Mini and beyond) upscaled resolution with the Vulkan backend. If you run into issues, try toggling ON the Graphics > Hacks > Skip EFB Access from CPU option. On older Retroid devices, there are several forks that may give better performance with certain games over the official app, but will introduce hacks to get them working. I would recommend using those forks only if the official app’s performance is not to your liking, especially for the RP3/3+/2S. The MMJR 11505 (final) and MMJR2 17878 versions are generally the best among that group.
For PS2 emulation, there are two main options: NetherSX2 “patch” (4248) and NetherSX2 “classic” (3668). Note that performance between the 3668 and 4248 versions can vary — some games just run better on one over the other (for example, Sly Cooper runs better on 3668). Sadly, you can’t have both installed on the device at the same time, so you will have to swap between the two. For most devices, I have found that NetherSX2 Classic (3668) generally provides more stable performance.
The main Nintendo Switch emulator (Yuzu) stopped development and was removed from general availability in 2024. More recent forks like Citron and Eden have made large strides and are generally recommended.
The standalone Yabasanshiro app generally has the best Sega Saturn performance, at the expense of some accuracy. For the Retroid Pocket 5/Mini and beyond, I recommend the Beetle Saturn core within RetroArch, which is highly accurate. This is a similar setup with Dreamcast; the Redream app’s auto-frameskip can sometimes help with performance on lower-end hardware, but the RetroArch Flycast core is excellent if you have the power to use it.
The Retroid Pocket devices can do more than just emulate games: they can also play the vast majority of Android’s game library. The trick is to find games that have controller support and will scale correctly for your device’s screen. This collection of Android game testing for the Retroid Pocket Classic is a great starting spot; while it was tested for the RP Classic’s unique aspect ratio, you can see which games have controller support.
Turnip drivers
When using a Snapdragon-based handheld like the Retroid Pocket 5 or 6, you can install third-party drivers built by the Mesa Turnip team to certain emulator apps to improve compatibility and performance. Emulators that support this feature include Dolphin, Azahar, Vita3K, and Yuzu (plus its forks). I find it to be a necessity for PS Vita and Switch emulation, but rarely provides a benefit with Dolphin or Azahar.
The two main places to find third-party drivers are from K11MCH1 and Mr. Purple. There are several versions of these drivers available from the main repository, and they are being updated all the time. However, keep in mind that the most updated drivers may not be the best for your device — it’s all very specific to the GPU found in each Snapdragon chip. For the Snapdragon 865 (found in the RP5 and RP Mini), these are the drivers I have had the most success with (in order):
| Snapdragon 865 (RP5 etc) | Snapdragon 8 Gen 2 (RP6) |
| Mr. Purple T19 | Mr. Purple T23 |
| v24.3.0 Revision 9v2 | v26.0.0 Revision 8 |
| v24.1.0 Revision 18 (A6XX fix) | |
| v24.1.0 Revision 18 |
For emulator apps like Eden, you can load several different Turnip drivers at once within the GPU Driver Manager section, and then set one as the default driver. They even provide you with a recommended driver for your device’s GPU. Often I will check Eden first, see what they recommend, then download that driver to use in other apps. If you encounter crashes or other issues, then long-press on the game in the emulator’s menu, then choose the per-game GPU driver manager and try an alternative (or even just the default Qualcomm drivers that come with the device).
Updating your apps
For apps that you installed via the Play Store, updating the app is as simple as going to the Play Store and then updating the apps under the “Manage Apps” function. For apps installed via Obtainium, simply go back to Obtainium and follow the prompts to install any updates that are available.
Adding your games
Now that we have our apps installed, and the system is configured, now we can add our games and point our emulators to them.
To start, plug your microSD card into the device. On older versions of Android, you may get prompted to “set the SD card up”; it will ask you to choose between the default portable storage option, or using the card as internal storage. Portable storage means that you will be able to freely take the SD card out of the device and plug it into your PC, and that is what I would recommend.
If you plan on using the ES-DE (EmulationStation Desktop Edition) frontend, which is my favorite frontend option, I recommend installing and running it once BEFORE you start adding your games. The ES-DE setup process will create ROM folders on your SD card; once those are created, you can add your ROM files to their respective folder so that ES-DE will automatically find them. This will save you a lot of time in the long run. Even if you don’t plan on using ES-DE initially, I recommend adding the ES-DE file structure to your microSD card anyway. That way if you do end up using that app in the future, everything will be set up accordingly. I have made a handy ES-DE Directories tool that you can paste into any microSD card.
If you plan on running Nintendo Switch emulation, be sure to grab the two XML files from Jade’s repository and place them in the ES-DE/custom_systems folder of your SD card; this will expand the number of supported emulator apps within ES-DE.
Setting up RetroArch
For more specific RetroArch settings, I recommend using my RetroArch Starter Guide as a reference. This will explain the basics of the app and how to properly configure settings.

Recommended RetroArch cores:

Arcade (FinalBurn Neo) -- fighting games and beat'em ups
Arcade (MAME 2003-Plus) -- all-around arcade emulation
NEC PCE/TG-16/PCE-CD/TG-CD (Beetle PCE)
Nintendo GB/GBC (Gambatte)
Nintendo GBA (mGBA)
Nintendo Virtual Boy (Beetle VB)
Nintendo DS (melonDS)
Nintendo NES (Nestopia)
Nintendo SNES (Snes9x Current)
Nintendo 64 (Mupen64Plus)
ScummVM -- point-and-click PC games
Sega Master System/Genesis/CD (Genesis Plus GX)
Sega Saturn (Beetle Saturn or Yabasanshiro)
Sega Dreamcast (Flycast)
SNK Neo Geo (FinalBurn Neo)
Sony PlayStation (Beetle PSX HW or SwanStation)


Per-system recommendations
Per-system configurations can vary by device, but for the best general settings, I would refer to my Android Emulation Starter Guide. For RetroArch-based emulators (32-bit and below systems), use the recommendations from the RetroArch Starter Guide. There are some specific configurations for the Retroid devices detailed below.
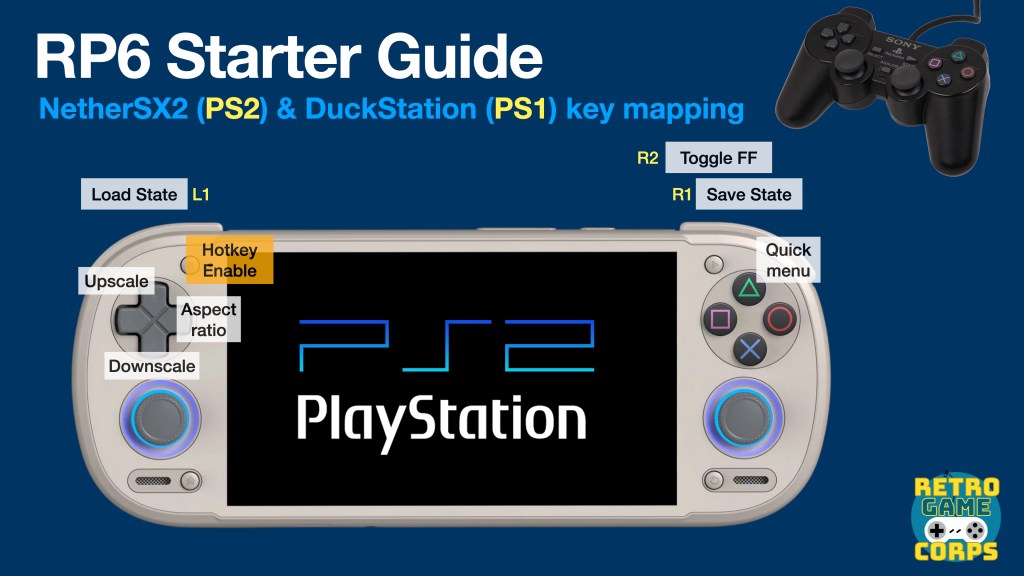


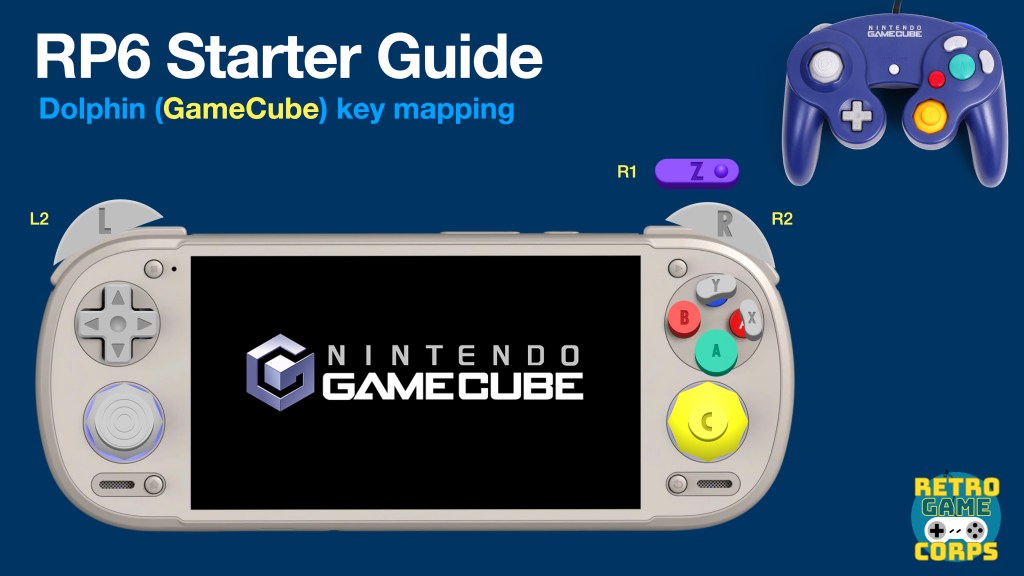
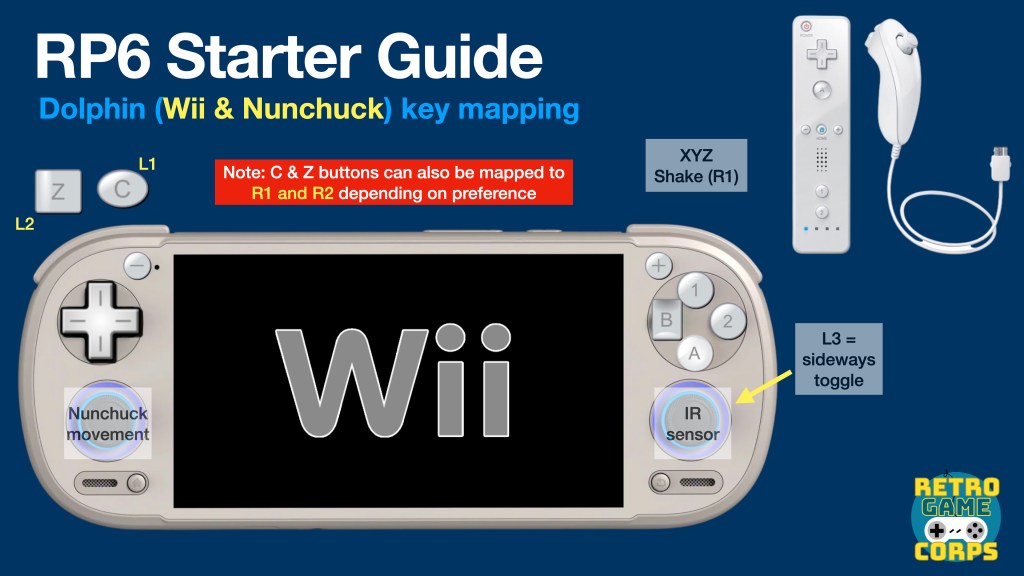

One of the biggest challenges in setting up these devices is mapping the controls to mimic the original controllers from retro systems. For many, the control setup will be intuitive: it’s easy to figure out how SNES, PS1, PS2, or Dreamcast games should be mapped, since their control schemes are not too different. The rub comes with Nintendo systems like the Wii, or six-button layouts like the Sega Saturn. The images above are what I personally use for mapping, but there are many ways to do this depending on personal preference.

Nintendo 64
Emulator: Mupen64Plus-FZ standalone (Pro version will remove ads) for RP4 and below, RetroArch Mupen64 core for RP5 and beyond
By default the N64 A and B buttons will be mapped to the A and X buttons. If you want to adjust your mappings, you will need to copy the Android Gamepad controller profile and make your own mapping. One handy trick is to map the Z button to multiple buttons on your console, to make things easier for some games (like Cruis’n USA which by default requires you to press the Left Trigger for gas, which can be awkward).
When using a frontend launcher like ES-DE or Daijisho, autosave and autoload will not work properly in the FZ emulator. Instead, you can either launch games directly from the standalone emulator, or use the Save/Load State functions within the emulator quick menu to manually save and load states. In-game saves still work fine either way.
Mupen64 FZ also allows for per-game configuration. For example, if a certain game is presenting graphical issues with the default emulation profile (like with Mario Tennis) you can tap on it once in the main menu, then select Settings > Emulation Profile and experiment with other options (I use GlideN64-Medium for Mario Tennis). You can also use this method to adjust other options per game, like rendering resolution or controller profiles.
If you want to use the RetroArch N64 cores with a frontend (like ES-DE), there is a bug where sometimes the controls won’t register after launching a game. To fix this, open up an N64 game and then go into the RetroArch Quick Menu. Back out to the main Settings menu, then Input > Polling Behavior > EARLY. Now go to Quick Menu > Overrides > Save Content Directory Override. Exit out of the game and now every N64 game should control correctly.

Sega Saturn
Emulator: Yabasanshiro 2 (or Pro version to remove ads) for RP4 and below, RetroArch Yabasanshiro core for RP5, and RetroArch Beetle core for RP6 and beyond
Notes: You will need to remap your controls. I recommend using YBA for ABC, and L1, X, R1 for XYZ buttons.
If you want the original Saturn boot video sequence with the standalone Yabasanshiro app, you must place the BIOS file (saturn_bios.bin) in the yabause/bios folder on your internal storage (this folder will only appear once you have opened the app at least one time).

Sega Dreamcast
Emulator: Redream for RP4 and below, RetroArch Flycast core for RP5 and beyond
Frameskip: ON (default)
Resolution: 480p for RP2+/RP3, 960p resolution for RP3+ and beyond
Notes: You will need to remap your controls. Upgrading the Redream Pro version will be associated with your Google Play Store profile and can be used on other devices with the same account to get upgraded rendering resolution.
If you want the original Dreamcast boot video sequence in Redream, you must rename the dc_boot.bin BIOS file to boot.bin and place it in the Android/data/io.recompiled.redream/files/ folder on your SD card (this folder will only appear once you have opened the app at least one time).

PlayStation Portable
Emulator: PPSSPP (or PPSSPP Gold to support the dev)
Resolution: 1x for RP2+/RP3, 3x+ resolution for RP3+ and beyond
For PlayStation Portable emulation on the RP3 and RP2+, check outthis handy guide from EmuChicken over at Team Pandory. For the Retroid Pocket 3+ and Flip, you can set most games to a 3x resolution, and reduce it to 2x resolution for some games as needed. PPSSPP allows for per-game configuration profiles so that you can set the desired resolution per game. The Retroid Pocket 5 and beyond can handle a 4x resolution upscale for maximum effect.

Nintendo GameCube
Emulator: Dolphin for Handheld (pre-installed) for up to RP3+/Flip, official app for RP4 and beyond
Internal resolution: .5x for RP3 and RP2+, 1x for RP3+/Flip, 2x for RP4/Pro as warranted
Notes: Use PAL ROMs as available for everything up to the RP3+/Flip. The RP4/Pro and RP5/Mini can generally use NTSC ROMs without issue.
The official Dolphin app supports VBI Skip, which can be found under Graphics Settings > Hacks > VBI Skip. Turning this on can significantly improve the gaming experience on lower-end devices like the Retroid Pocket 3+. Note that some games (like Twilight Princess and Wind Waker) will not work properly with this setting turned on, so you may need to experiment.
Within the Dolphin settings, I would recommend making these changes:
- Config > Interface > Use Panic Handlers > OFF
- Config > General > Enable Cheats > ON
- Config > General > Enable Savestates > ON
- Graphics Settings > Shader Compilation Mode > Hybrid Ubershaders
- Graphics Settings > Compile Shaders Before Starting > ON
For the best results, you will want to swap between Graphics Settings > Video Backend > OpenGL and Vulkan. Generally, Vulkan will provide better performance but won’t work with many games.
For the Retroid Pocket 2+ and 3, I recommend using the “Dolphin for Handheld” emulator that can be pre-installed on your device during the initial setup. This app provides an excellent mix of accuracy and performance, and allows for easy adjustment of the resolution to below-native figures. If you do not have access to this app, you can try some of the Dolphin forks available in this archive.
If you want to dive further into Dolphin, check out these video guides. The first one will show you how to add that cool GameCube boot logo to your games, and the second will show you how to set up Wiimotes and accessories.

Sony PlayStation 2
Emulator: NetherSX2
Internal Resolution: .5x for RP3 and RP2+, 1x for RP3+, etc.
Preset: Fast/Unstable for lower-end handhelds, Normal for RP4 and beyond
Notes: Use PAL ROMs as available for everything up to the RP3+/Flip.
If using the Retroid Pocket 3+/Flip, then I recommend setting it to the “Fast Preset” when first setting up the device, but use a 100% EE Cycle Rate and no underclocking under EE Cycle Skip, and adjust them as needed for each game.
For the best results with the RP4 and RP5 devices, use the Vulkan backend and toggle the following settings in this order if it isn’t running at full speed by default:
- Graphics > Hardware Download Mode > Unsynchronized (experiment with others)
- Graphics > EE Clock Rate / EE Cycle Skip > decrease values as needed
Consider a nice fancy frontend
The Retroid Pocket frontend is pretty good, one of the best built-in launchers available on retro handheld devices. However, I have found that it is limited (for example, some systems or emulators aren’t available), and won’t be as feature-rich as other options made by the community.
Check out the videos above for setup instructions. My favorite is ES-DE (EmulationStation Desktop Edition), but Daijisho is pretty great too! And don’t forget about Beacon, or Reset Collection — long story short, you have lots of options to choose from. The way I see it, apps like Beacon and Daijisho are a little easier to set up initially, but will take more maintenance in terms of upkeep (like adding/removing games) and scraping media. ES-DE takes more work up front but is largely automated after that, and feels more console-like once configured.
If you are using ES-DE, there was an update in 2025 that allows you to integrate your Android apps and games directly into the interface. Check out my video guide on the process!
How to fix the ES-DE Theme Downloader error: On the Retroid Pocket G2 (and potentially other handhelds), if you try and download ES-DE themes you may get an error (“Failed to Lock File”). The fix for this is simple, but unintuitive: Go to Android Settings > Handheld Settings > Advanced, and you should see a toggle named something like “force start selinux”. Toggle that ON and you will now be able to download ES-DE themes properly.
Try out PC gaming
Advancements in PC translation layers now enables us to play PC games on Android devices. Many of these apps allow us to log into our Steam account, sync our Steam Cloud Saves, and more. The video above will explain how it all works, and give you some tips and tricks along the way. My buddy Retro Tech Dad also has several guide videos on the subject, which are super handy.
GameHub — Windows/Steam
GameHub Lite — Windows/Steam (no login required)
GameNative — Windows/Steam/GOG/Epic
Winlator — Windows
Game streaming
Newer Retroid handhelds have beautiful AMOLED screens, which makes them a wonderful way to stream games locally from your PC, or over the cloud with apps like NVIDIA GeForce Now. The video above will show off a couple of my favorites, with Apollo/Artermis quickly becoming my go-to recommendation.
Artemis – Android client (Moonlight fork)
Apollo – PC host (Sunshine fork)
When using the Retroid Pocket 6, here are my recommended Artemis settings:
- Video resolution: 1080p
- Video frame rate: 120fps
- Video bitrate: 40 Mbps (adjust for your local network)
- Video frame pacing: Warp 2 (Experimental)
- Ultra Low Latency: ON
Sync your saves with Syncthing
Once your device is up and running, and you’re ready to jump into some games, I would recommend Syncthing. This will allow you to sync your saves with your computer or other devices, so you can back them up and also resume your games on other handhelds. Here is my full guide on the process; it’s definitely a weekend project but it’s nice to have some peace of mind that your saves aren’t going to disappear.
Linux options
The Retroid Pocket 5 and Retroid Pocket Mini are unique in that their Snapdragon 865 CPU can support booting into Linux-based operating systems. Right now two options are Batocera and ROCKNIX, with the latter being a little further along in development. These are still very much in the experimental phase, but once we have stable and mature builds I will make further guides on the project.
What makes Linux OS options attractive is that they generally are faster to get up and running, since its emulators will be installed as part of the OS and pre-configured. It also gives access to some emulators that aren’t available on Android, like Xemu (Xbox) and RPCS3 (PS3). Performance of those consoles on a Snapdragon 865 chip isn’t the best right now, but it’s still super cool to see this added functionality on these handhelds.
For now, you can test out the latest development builds, and use the instructions in the video above to boot into them.
Batocera test build
ROCKNIX nightly dev build (further discussion in to their discord)
Note that it is possible to dual-boot ROCKNIX and Android with the same microSD card, and share the same ROM files between the two. This Reddit post spells out the process in detail, but be warned that because ROCKNIX is still in a test phase, this process should be attempted only if you are tech-savvy and willing to deal with bugs and periodic incompatibilities. In order to have ES-DE recognize all of your ROCKNIX folders, be sure to use Jade’s custom XML files.
1080p overlays
Community member Watomsk made some overlays for 16:9 1080p displays, like the Odin 2, Retroid Pocket 5, and so on. You can find the packs here, and the installation process can be found in my Shaders and Overlays Guide. Additionally, L3x19H made a collection of similar (16:9 1080p) overlays but for playing the games with integer scaling ON. This will provide an even sharper image at the expense of a slightly smaller game image. Check them out here!
Note that because newer Retroid devices have an OLED panel, there could be some risk of eventual screen burn-in when displaying a static image for extended periods of time. Most modern OLED panels don’t have this issue (even after thousands of hours at max brightness), but it’s always worth considering.
Changelog
10FEB2026
– lots of updates in anticipation of RP6 starter guide video
– changed Winlator section to PC gaming
– added Game Streaming section
19JAN2026
– added notes about RPG2
– updated frontend section to account for ES-DE updates and RPG2 theme downloaded fix
22MAY2025
– added section about Android games
– added notes about RP Mini V2
13APR2025
– added note about N64 RA core polling behavior
– added RP Flip 2 review video
02APR2025
– added additional 1080p overlays pack
28MAR2025
– added 1080p overlays
– updated RP Mini screen issues section
31DEC2024
– added Jade’s custom XML files for ESDE w/ ROCKNIX
21DEC2024
– added RP5 guide video and assets
– added Turnip drivers section
– added Syncthing section
– added Linux section
– added Winlator section
16DEC2024
– lots of updates in anticipation of RP5 starter guide video
13OCT2024
– added section regarding frame pacing issues on the RP Mini
– updated frontend section to reflect ESDE
02JUN2024
– updated links for compatibility sheets and AetherSX2 archives
05MAR2024
– removed Yuzu and Citra links
17FEB2024
– updated NetherSX2 section to account for NetherSX2 “patch” and “classic” versions
07FEB2024
– added video guide
06FEB2024
– more updates including performance tweaks for PS2 and GC/Wii with RP4 Pro
05FEB2024
– updates and cleanup in anticipation of RP4 guide video
25AUG2023
– added RP2S as applicable
– general cleanup of links
– added context for AetherSX2 v1.5 3668 in the notes
07MAY2023
– added display setting recommendations
– added wording re: Retroid Pocket Flip
30APR2023
– removed other Dolphin MMJR links
11APR2023
– added updated tips for Dolphin/GameCube emulation
05APR2023
– updated Dolphin section link to fork archive and official app
22MAR2023
– added sleep mode trick section
20MAR2023
– added link to powered USB hub in accessories section for maximum controller compatibility
28JAN2023
– removed links to “Dolphin for Handheld” apk at the request of the Dolphin team
31DEC2022
– added screen saturation instructions
06DEC2022
– updated links to community compatibility sheets
24NOV2022
– added Retroid Pocket 3+ as a supported device
– added the Dolphin for Handheld emulators
– added information about remapping the Home button
– added Daijisho information
14SEP2022
– added notes about bug related to RA not recognizing the A Button after mapping it as a hotkey
11SEP2022
– added Team Pandory PPSSPP guide
– added link to AliExpress store
– added section about fixing microstutters (in RetroArch section)
08SEP2022
– added RP3 starter guide
– added Where to buy section
– streamlined guide to reflect new launcher and updates
23JAN2022
– added detailed N64 configuration instructions
– added note about 32-bit PSX emulation core
22JAN2022
– added new systems
– added Starter Guide #2 video
20JAN2022
– added RetroArch playlists section
– added system art and additional recommended systems (like Sega Genesis)
17JAN2022
– added retroarch.cfg file and instructions (removed)
16JAN2022
– published guide
– added portable vs internal storage note

Yooo, Changelog says update in anticipation of RP4 Guide Video. Can’t wait! Thanks for all the hard work, Russ!
LikeLike
The best guide for RP4 devices (written and YouTube) by far! Thanks for your hard work! Where can I donate?
I also have questions regarding bios files:
The list above is all I need right? And regarding the PS1 and PS2 bioses you wrote “many options”. What does that mean? I mostly want to play European rom version, are the bios files you listed ok for this?
LikeLike
The list above will be enough for most systems, there will be random systems that require BIOS, like old computer systems. There are multiple PS2 and PS1 BIOS options out there, the ones listed are just examples. As long as the emulator is set to “fast boot” (and they are by default), it will bypass the BIOS region checks and so you can play EUR ROMs with any BIOS file.
LikeLike
Would you happen to have tried connecting an external controller to Daijisho? It works fine navigating through the front end, but doesn’t work anymore going into games…
LikeLike
Yes, this is a common issue with playing Android on an external controller. Each individual emulator needs to be set up for the external controller. On RetroArch it’s relatively seamless so often you don’t need to configure anything, but for other emulators (like Dolphin) you will need to make a new controller profile, map it again using the external controller, and then choose that profile when launching a game with an external controller. It’s not seamless, but unfortunately Android wasn’t really built with external controllers in mind like that.
LikeLike
Hi! I’m having a problem with GameCube and ps2 games. Neither Dolphin or aethersx2, neither Daijisho are able to read them, but I can see them with Files app. I think this is because of my microSD format. I’m using exFat. Which one do you use? Has this happened to you?
Love your work! Thank you!
LikeLike
ExFAT is the correct file system, are the games in a compatible file format? I generally CHD and RVZ for my PS2 and GC games, respectively. Here is my guide in setting those up: https://retrogamecorps.com/2023/02/06/the-ultimate-rom-file-compression-guide/
LikeLike
I do not see swanstation as an available core within retroarch anymore. Is this just me?
LikeLike
I just checked and it’s still there in the nightly RetroArch 64-bt version.
LikeLike
There’s a little quirk I noticed while following this guide on the RP4 Pro:
For some resason, a short press on the power button while in a game (retroarch playing a SNES game for example) won’t put the device to sleep but only turn off the screen (I can still hear the game sounds). The same thing on other retroid devices I tested (Pocket 2S, Pocket 3+) will suspend the game as expected.
Any idea what might cause that?
LikeLike
Love the guide, thanks for the big write-up!
LikeLike
hey russ! i’m getting a rp2s fairly soon and was wondering if daijisho was something to do after the guide or if you do it at a certain step? also, does the rp2s run the same games as the rp3?
LikeLike
Hello all, it looks like https://www.aethersx2.com/archive link is now unreachable. Is there any other place to download this .apk? Or should we just use 3668 build?
LikeLike
https://web.archive.org/web/20230604175057/https://www.aethersx2.com/archive/android/alpha/15210-v1.5-4248.apk
Sorry I guess i answered my own question.
LikeLike
Hey Russ – you’ve got a broken link above. In the green compatibility spreadsheet section, the Pocket 2S link melds into the 3+/Flip link. I think this is the address you were intending to link to for the 2S:
https://tinyurl.com/RP3PlusGameSettings
LikeLike
lol, I just did the same thing I think you did. The link in the spreadsheet itself is incorrect… here is the correct one:
https://tinyurl.com/RP2SGameSettings
LikeLike
How do I get the buttons to not show on the screen in gamecube games?
LikeLike
Hi, watched and liked many of your videos, thanks for your efforts.
How do you get the Redream emulator to work with the built in controller on a RP2s? It is a bit odd that you recommend an app that does not work properly…
For me it is broken, regardless of the mapping (which does not work properly as some simple inputs results in multiple keys being mapped in one go). It seems many have a similar issue:
https://www.reddit.com/r/OdinHandheld/comments/sfgrnx/anyone_else_having_controller_issues_with_redream/
Also would you be kind enough to have a look at 3DO, Jaguar and less mainstream systems on handhelds?
LikeLike
Hello and thank you for all your videos and guides.
I would like to know the format/extension for the “big” roms (compressed or not), specifically PS2, GameCube and Wii. I will soon receive a RP5 and try to populate my sd card with all the games and such. The RetroArch part is ok but the others, not so…
Thanks again for all your work.
LikeLike
Agreed, I’m receiving my RP5 soon and I’m curious about the same things. I would also like to see a few sections of the article updated to include the RP5
LikeLike
Good day/evening, what is the microsd capacity of rp5? im planning to buy 1.5tb on amazon.
Can the rp5 play/read game via usb port?
Thank you
LikeLike
The RP5 reads exFAT, which means that it can handle any SD card size available on the market and then some. Bear in mind that the larger the card, the slower its read/write speeds will usually be. This can cause an issue if you have ESDE set up as your primary home launcher and your ESDE folder resides on the SD card — sometimes the app can’t read the data quickly enough and will cause errors. If you are going to use a 1.5TB SD card I would recommend putting your ESDE folder on your internal storage to prevent issues like this.
As far as whether it can read games via USB port, it will depend on the drive you connect to it — if it has a high power draw then the device won’t be able to read it. Generally lightweight USB thumb drives are fine, but USB SSDs require too much power to be effective.
LikeLike
thank you for the info. i will put my ESDE on my internal storage and my roms in microsd.
again, thank you
LikeLike
Hi Russ, thanks for this great guide. I have some feedback about a minor error in it. In the “Recommended accessories” section, you recommend the Retroid Dock for the Retroid Pocket Mini. But on Retroid’s website, they say their dock is not compatable with the Retroid Pocket Mini. I would recommend something like this for the Mini: https://www.amazon.com/dp/B0D9D2HDYN
Thanks, have a nice one!
LikeLike
Hi, great work here! I’ve been using this to set up my RP5, and it’s been super helpful. As I’m building my library of games, I was wondering—what does “lite Switch” mean exactly? I’ve never owned a Switch, so I’m curious. Thanks in advance, and I really appreciate your YouTube channel; it’s been such a great resource!
LikeLike
Russ, I am trying to download the RetroArch cores following your instructions, but I can’t find the SNK Neo Geo (FinalBurn Neo) in my list. Do you know how I can get that added?
LikeLike
same, did you ever figure it out?
LikeLike
Nope.
LikeLike
Thanks for your work.
I have bought RP5 recently, now playing with installation of emus, roms etc. One question is that some interesting Android games are huge now and I only have 40GB of space left in internal storage. I have 512GB SDXC and could use it to expand. Any known tricks how to move Android games data to SD card? Can’t find such options in settings under each App or in Files by Google… Thanks in advance!
LikeLike
Hey Russ. Have been enjoying your stuff and waiting for my bonus to buy an RP5. One thing that will need addressed in this guide is the recent removal of Drastic. The apk is still out there but it should get linked or see if there is another DS emulator that is going to work on the Play store as well as Drastic did
LikeLiked by 1 person
I have followed this to a T. But Cemu is not working. It says I need a Keys txt but I am not seeing anything after google research
LikeLike
Would set up be similar for the retroid classic?
Thanks!
LikeLike
Another guide I need, thanks 🙂
LikeLike
i don’t know how often to check this but what charger(s) do you recommended for the rp4 pro? I really don’t want burn this device out
LikeLike