

Last updated: 10JUL2024 (see Changelog for details)
This guide will show you everything you need to know about the Miyoo Mini and the Miyoo Mini Plus — where to buy one, the best tools to get it set up, accessories, and how to install custom operating systems like Onion and MiniUI.
Buy one here: AliExpress | Amazon (faster shipping) | KeepRetro | DroiX
Note that due to demand, availability has been an issue. The cheapest prices will be through the official Miyoo store on AliExpress, but you will need to check periodically to see when the device will be in stock. You can also try third-party vendors like KeepRetro or DroiX, or you can pay a premium price on Amazon to get it more quickly.
Table of Contents:

Recommended tools
Accessories and mods
Update to the April 2022 firmware (Miyoo Mini)
Update to the May 2023 firmware (Miyoo Mini Plus)
OnionOS installation
Add BIOS files
Add game files and images
Nintendo DS and Pico-8
Multiplayer (Miyoo Mini Plus)
Customize your themes
MinUI installation
Custom boot logo

Changelog
Recommended tools

To install new firmware, I recommend starting from scratch with a new microSD card. You could use a 16GB card to save on costs and keep your game library trim, or you could fill it up with the works. Personally, I use a 32GB card in mine, with only a few PS1 and Sega CD games taking up the majority of the space. Here are the cards I recommend:
16GB cards:
SanDisk Ultra
SanDisk Industrial

32GB cards:
Samsung Pro Endurance
SanDisk Extreme

64GB cards:
Samsung Pro Endurance
SanDisk Extreme

128GB cards:
SanDisk Extreme
Samsung EVO Select
Samsung Pro Endurance
SanDisk Ultra

The Miyoo Mini/Plus will come with a cheap SD card reader, but I recommend a nicer one instead. This one from Anker has never done me wrong for $15, and I also love this more fancy version with USB-C and USB-A connections.
Accessories and mods
One of the great things about a popular device like the Miyoo Mini is that the community comes together to find all sorts of accessories and solutions to every little need. There are plenty of choices when it comes to custom buttons and stickers, 3D-printed grips, and more. The original Miyoo Mini is approximately the same size as a deck of playing cards, so playing card cases are great alternative carriers for this device.
Miyoo Mini Plus accessories:
Cases:
Hardshell case
Custom leather case
Snap-on screen protector case
GripCase
Other accessories:
Buttons and stickers (Sakura)
Better Buttons (GetBetterButtons)
Miyoo Mini accessories:
Cases:
Maze (synthetic) leather case
Custom leather case
Hardshell case
Snap-on screen protector case
Other accessories:
Buttons and stickers (Sakura)
Better Buttons (GetBetterButtons)
Magnetic charging dock
3D-printed grips

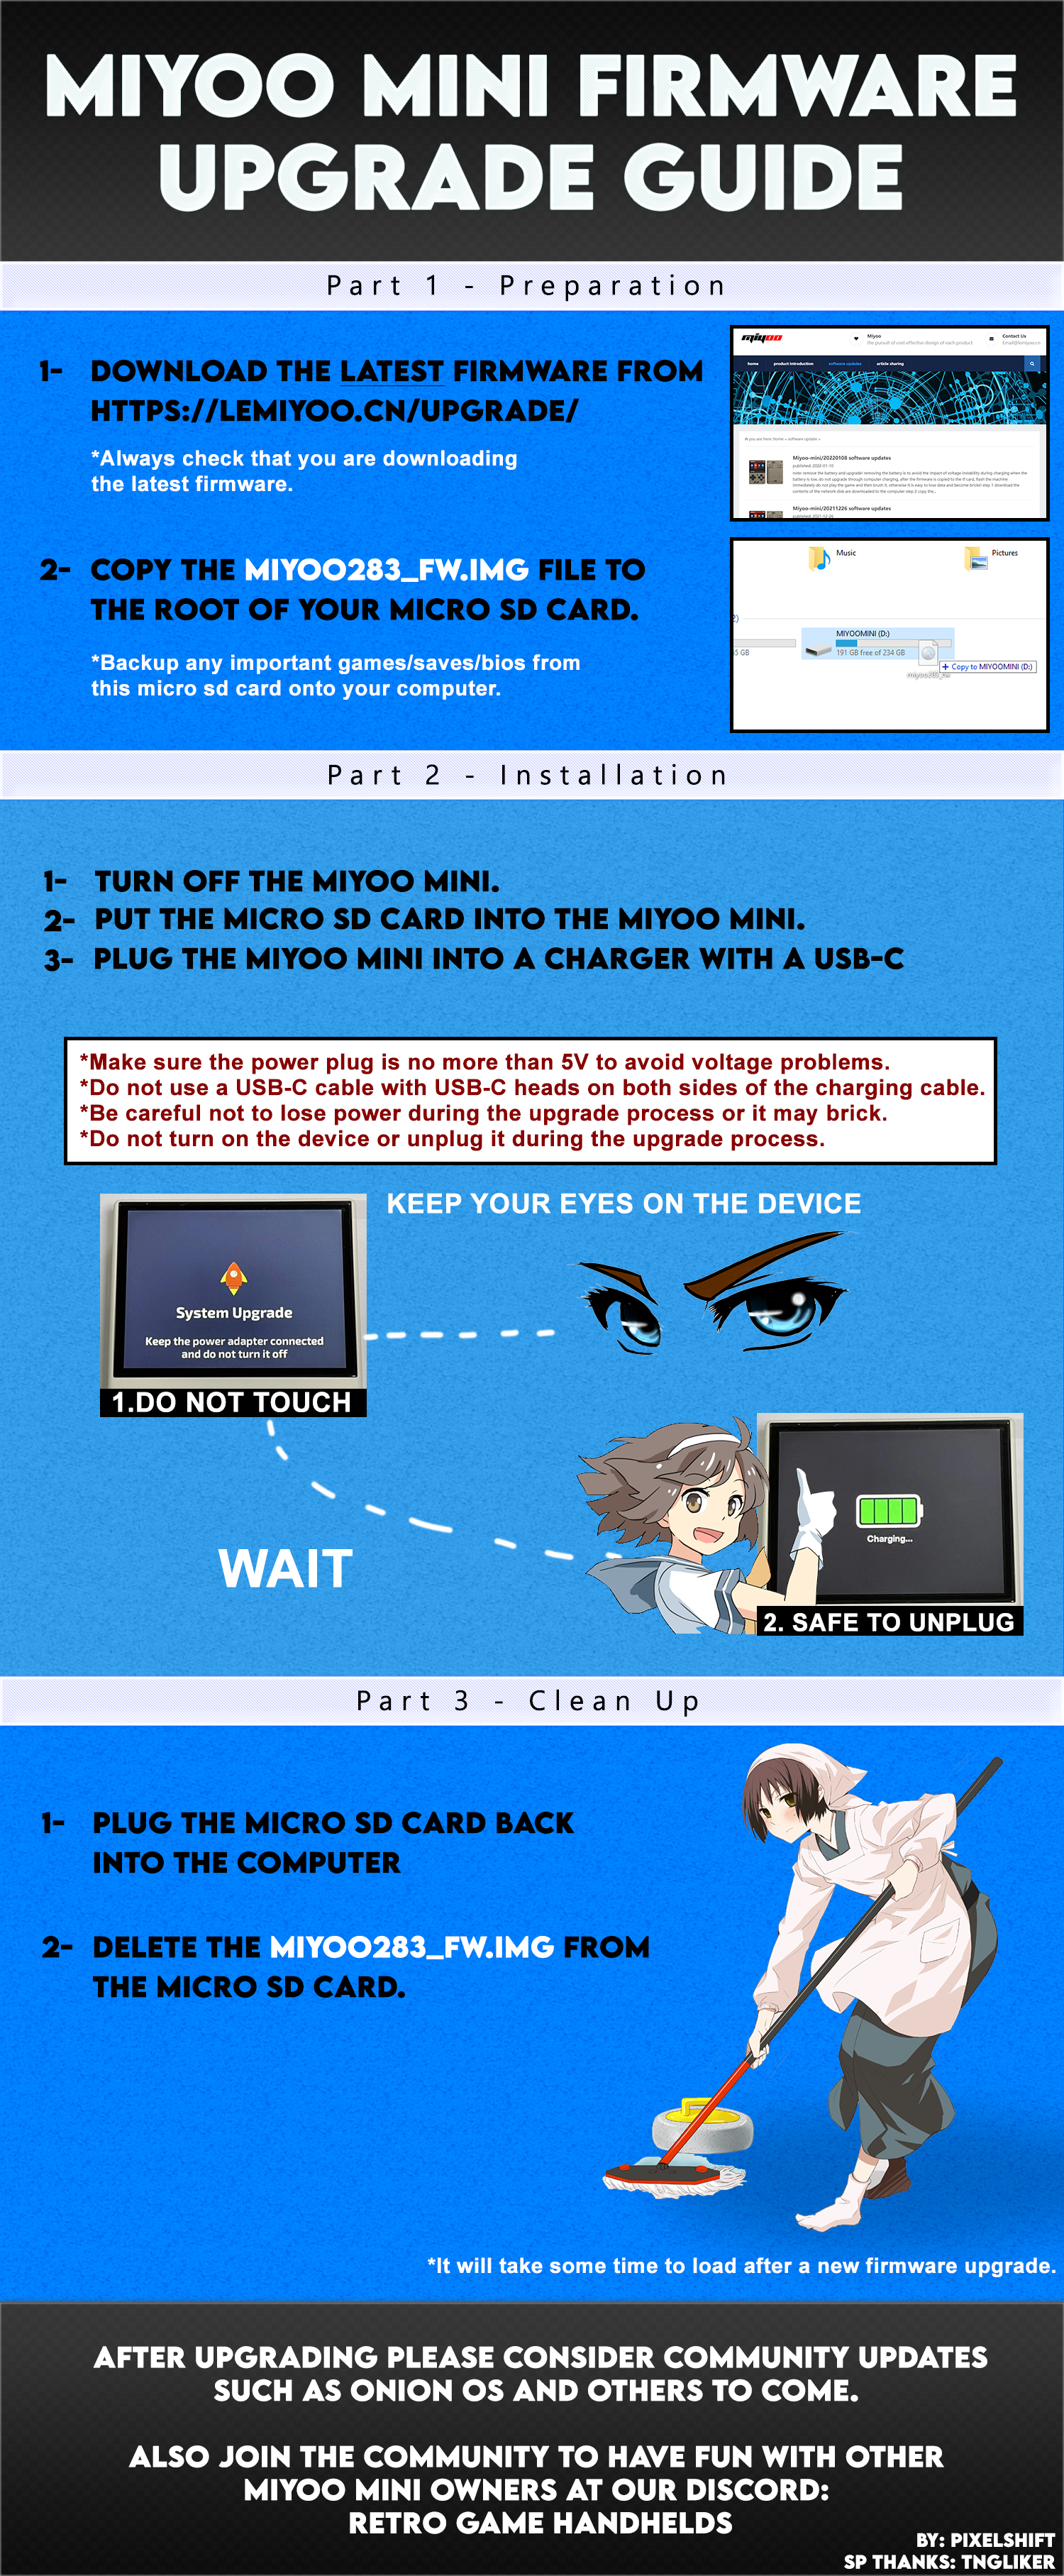
Update to the April 2022 firmware (Miyoo Mini)
In order to use the most recent versions of OnionOS, you must first update the Miyoo Mini base firmware to the April 2022 (or later) version. To check your firmware version, go to Setting > Device Info and verify the the “Version Number” is 202204190828 or “20221216XXXX” — if so, you are good to go to the next section. If it is something earlier (i.e. it starts with 202201… instead) then follow the firmware update instructions below. Note that if you have the Miyoo Mini v4 (it will say so on the device’s back sticker), it needs to be updated to the 202310271401 firmware, which should be found on most devices anyway. In the rare event that you have an older firmware version, update it using this file.
- Save any important game files or your BIOS folder to your computer just in case.
- Go to the OnionOS installation guide and download the latest image update, then unzip the file.
- In the unzipped folder, go to “The firmware” > miyoo283_fw.img and drag that file into the root of your Miyoo Mini SD card
- Go to “TF card” folder and drag the three subfolders (Emu, miyoo, and RetroArch) into the root of your card, and replace any existing files when prompted (this part is optional).
- Eject the SD card from your computer and plug it into the Miyoo Mini
- Plug the Mini into a wall charger, and be sure to use use a low-wattage wall plug. For best results, use a USB-A to USB-C cable, and a “smart” plug that can adjust wattage, or one of those cheap 5V/1A plugs that used to come with cell phones.
- The Miyoo Mini will automatically power on and run the update. Don’t touch the device at all!
- The device will restart and will then display a battery image and the charging screen. At this point you are done. Unplug the device from the cable and remove the SD card.
- Plug the SD card into your computer and delete the miyoo283_fw.img file before doing anything else.
Here is a fancy infographic (credit: PIXELSHIFT and TNGLIKER) that walks you through the process.
If you are having issues upgrading your device, or it gets caught in a loading screen while flashing the new firmware, follow the instructions provided in this Reddit comment.
Update to the May 2023 firmware (Miyoo Mini Plus)
The Miyoo Mini Plus will need to be updated to the 202305052130 (or later) firmware to take advantage of new developments for OnionOS. The video below will walk you through the process, but it’s as simple as downloading the firmware file found on the OnionOS installation guide and placing it in the root directory of your microSD card. From there, plug a 5W USB-A to USB-C cable into the device while it is off, and it will power on and update.
Here is a fancy infographic (credit: PIXELSHIFT and TNGLIKER) that walks you through the process.
OnionOS installation
Here are the installation instructions for Onion. For a full list of features, stop by their Features page. If you run into any issues, be sure to check out Onion’s comprehensive wiki page.
Easiest method (Windows): use Onion Desktop Tools to both format the card and install OnionOS.
Manual installation:
- Format your microSD card to FAT32 file system.
- If using Windows, use the guiformat tool to format the card to FAT32. You can name it whatever you want.
- If you have a Mac, “Erase” the disk using the Mac’s built-in Disk Utility app, with the format MS-DOS (FAT), name it whatever you want.
- Head over to the Onion homepage and grab the latest stable or beta release (it will be a zip file).
- Unzip the file, and place all of the contents into your SD card.
- Eject the SD card and place it in your Miyoo Mini. Start up the device and it will run the installer.
To update from a previous release of Onion, check out the Onion upgrade instructions from their wiki page.
Credit for Onion goes to their wonderful ragtag team of community contributors.
Add BIOS files
Once you have run the Onion Installer, you can now shut down the device, eject the microSD card, and add your files to it.
In the BIOS folder, add your BIOS file collection. You can simply copy/paste the files from your stock SD card, or add your own. On the stock SD card, you can find the BIOS files under RetroArch > .retroarch > System
You will need to be able to see hidden files in Windows or your Mac to see the .retroarch folder. Here is how to do that:
- Windows 10: Open File Explorer from the taskbar. Select View > Options > Change folder and search options. Select the View tab and, in Advanced settings, select Show hidden files, folders, and drives and OK.
- MacOS: Press CMD + SHIFT + . (period) to show/hide hidden files.
To see a recommended list of BIOS files to add, head over to the Onion wiki page to see their list of emulators and recommended BIOS files for each system. For most systems, BIOS are not required, but can enhance the playing experience (like adding the original boot logo when starting up a game). For systems like PS1, Sega CD, and TurboGrafx-CD, BIOS are a necessary component.
Add game files and images
In the Roms folder, add your game files into the corresponding subfolder. Some of the folders are named after their Japanese counterpart, like “FC” (Famicom) for NES, “MD” (Mega Drive”) for Sega Genesis, or “PCE” (PC-Engine) for TurboGrafx-16. For a full listing of each folder and the accepted file extensions, check out the Onion wiki page. You can also run a limited number of ports and third-party apps on the device, too.
When adding game files for systems that use the same RetroArch core file, you can create subfolders. For example, You could make Sega CD and Sega 32x subfolders inside of your Sega Genesis to clean up your front menu and streamline the navigation experience.
If you would like to add boxart to your games, here is more information. You can also check out the Nintendo DS video below to see how to scrape boxart online on the Miyoo Mini Plus.

For a list of hotkeys in Onion, check out this page. For more in-depth features and issues, check out their FAQ page.
Nintendo DS and Pico-8
Recent updates from the community now allow for Nintendo DS emulation and the ability to play Pico-8 games (and its trademark Splore menu) natively. See the video above for a demonstration and walkthrough of the experience. Both apps will work fine on the Miyoo Mini and Miyoo Mini Plus, but for the online functionality of Pico-8, you will need a Miyoo Mini Plus connected to the Internet. Note that these apps require you to be running the latest version of OnionOS.
Update: thanks to the latest updates to OnionOS, Drastic is now simply an available emulator option within the setup menu, like any other system. You won’t need to manually install it as detailed in the video above. Simply place your .nds files in the ROMS > NDS folder.
| R2 | Swap screen |
| L2 | Change Keypad mode / Stylus mode |
| SELECT + R1 | Fast forward |
| SELECT + R2 | Quick save state |
| SELECT + L2 | Quick load state |
| SELECT + L1 | Exit DraStic emulator |
| SELECT + START | Enter the customized menu |
Pico-8 (Native): Thanks to the latest OnionOS update, you can now simply add native Pico-8 to your device via the Onion Package Manager’s Expert section.
One you’ve added it to your device via Onion Package Manager, you will need the data files from the Pico-8 commercial license (Raspberry Pi version), which you can purchase here. Once downloaded, open your Raspberry Pi Pico-8 file and find two files:
- pico8_dyn
- pico8.dat
Copy these files over onto the RApp/PICO-8/bin folder on your OnionOS microSD card. Put the card back into your device and you will now find Pico-8 within the Expert section of your user interface.
Note that you will need to be connected to WiFi (i.e. on the Miyoo Mini Plus) in order to take advantage of the Splore browser menu. If you would like, you can manually add games (“carts”). To do so, go to the Pico-8 website and find some games you want to play (you can play them directly in your browser to test them first). Once you find a game you like, in the game’s window there will be a little “cart” icon on the bottom-left. Right-click on that and select “Save As”, the file will be saved as a .png file. That is a Pico-8 cart! On your OnionOS microSD card, make a folder named “PICO” inside of the “Roms” folder, and add your carts there. Now, when you open up the Pico-8/Splore app, you will find them under the “Local” menu.
If you are looking for Pico-8 games to try, here are some great lists:
- Pico-8 recommendations thread on Reddit
- Pico-View is a monthly zine with lots of reviews and recommendations
- PicoShorts is a review series of Pico-8 games
Multiplayer (Miyoo Mini Plus)
The Miyoo Mini Plus has built-in WiFi, making it capable of netplay between multiple Miyoo Mini Plus devices. I’ve made two videos on the subject: first, the video on the left will show you how to set up RetroArch netplay for either local or over-the-internet multiplayer, and the video on the left will show you how to set up an ad-hoc network play session, and also how to trade and battle Pokemon for the Game Boy and Game Boy Color versions of the games.
Speaking of Pokemon, here are instructions regarding RTC functionality on the Miyoo Mini Plus.
Customize your themes
The Onion apps section has the ability to install your own themes, and you can also grab more from this massive themes repository. Moreover, you can adjust the themes to your liking, or create your own.
You can also adjust the music in the themes; for example, you could download this lo-res version of the Retro Game Corps theme song and add it to your theme of choice. In a fun twist, this theme was written by Jim Gray, one of the first Onion developers. Thanks to HyperPragmatist for editing the song down to work as a Miyoo Mini theme! To add your own track, rename the file to “bgm.mp3” and place it in the Themes > [name of theme] > sound folder on your SD card). Note that the tracks need to be 96kbps, 48khz, mono, and under 2 minutes to work as a Miyoo Mini theme.


MinUI installation
MiniUI is a lightweight launcher that is focused on simplicity, and works on both the Miyoo Mini and Miyoo Mini Plus. As expected, the installation of MiniUI is simple. Note that the Miyoo Mini firmware upgrade is not required for MiniUI.
- Head over to the MiniUI GitHub page and download the latest release
- Inside the release will be a readme file, simply follow those instructions!
- If you would like to add the official “extra” systems, download the extras zip from the same releases page and follow the instructions inside the provided readme file
- If you would like to add community-driven “extra” pak systems, check out Tiduscrying’s repo.
Note that in my initial MiniUI video, I mentioned that some SNES games don’t play at full speed. One way to improve performance is to keep the games at Integer Scaling (“Native” in the options menu) which will improve performance. For example, Final Fantasy III (SNES) will play at full speed without frameskip when at Native resolution.
To update MiniUI, download the latest release (base version), unzip the file, and move the miyoo folder into your SD card. It will take care of the rest upon your next bootup.
Credit for MiniUI goes to the always-prolific Shaun Inman.
Custom boot logo
If you would like to use (or create) a custom boot logo for your Miyoo Mini, you can follow the instructions in the video above. This can be used with any firmware or operating system. Here are all the pertinent links that you’ll need to get set up:
LogoTweak app
Retro Game Corps boot logos (right-click and select “Save As…”)
Additional boot logos from artist JDewitz (right-click and select “Save As…”)
Additional boot logos from PaynefullyCreated (right-click and select “Save As…”)
If you happen to brick your device in the process (I haven’t heard of a single instance with any firmware except for those running 20221216XXXX, but it’s still theoretically possible on the older firmwares), here are instructions on how to recover your device. Here is another set of instructions to recover the device.
Note that the disappearing boot logo images in MiniUI (as shown in the video above) have now been fixed by the LogoTweak developer, so it will work great in both OnionOS or MiniUI.
Changelog
10JUL2024
– updated NDS and Pico-8 sections to reflect the latest version of OnionOS
26FEB2024
– added link to Miyoo Mini v4 firmware file
17JAN2024
– updated to reflect new Starter Guide video
05NOV2023
– added Nintendo DS and Pico-8 section
28SEP2023
– updated links to new Onion wiki page
– updated links to new MinUI page
21AUG2023
– added Multiplayer section
– added MinUI fork (MMP) section
11APR2023
– added new video link and Miyoo Mini Plus firmware update instructions
07JAN2023
– updated logo tweak section to warn users about potentially bricking their device if it is running 20221216XXXX firmware
01JAN2023
– updated warning to coincide with OnionOS v4.0.4 release which fixes the 20221216XXXX firmware issue
31DEC2022
– added warning about “20221216XXXX” firmwares
28SEP2022
– added Onion v4 installation guide video
– streamlined the accessories section
26SEP2022
– updated Onion install instructions
– separated the firmware update section
– added MiniUI update instructions
15AUG2022
– added custom theme music and custom boot logo instructions
26JUL2022
– updated links to OnionOS repo and FAQ fork
19JUN2022
– added additional complementary videos
15MAY2022
– published guide

I just ordered a V1 and I was wondering if this guide is applicable to that or just the V2? I want to make sure to get Onion on there and want to get everything done right!
LikeLike
Yes, this will also work with the V1 model, as long as you’ve updated the base firmware to the April 19 release.
LikeLike
Thanks for the response!
LikeLike
Only differences are screen and battery. The system is otherwise the same.
LikeLike
Appreciate it! I’m so spoiled with US shipping. The wait is killer for AliExpress.
LikeLike
does the miyoo mini and miyo mini plus support 256gb memory card ??
LikeLike
Is there a way to remove unwanted emulators from Onion post install?
LikeLike
My V2 justed arrived, but without any sd-card. I found a download-link to the image, but it’s not recognized by the miyoo mini. It says “unmounted”. I flashed the zip-file as an image to the sd-card. Any ideas how I can get my device to work?
LikeLike
Is the version of Retroarch that runs on this device updateable?
LikeLike
Thanks for making this update video, I kinda had to put my Mini on the back burner for a little bit because I wasn’t sure how to get Onion installed. Works great now though!
LikeLike
Now the firmware upgrade comes with two TF Card folders and it is not clear which one should go on the sd card.
LikeLike
Hi Russ,
great video, made me instantly order a V2 version, although I also have the V1. It arrived (finally!) today and I tried to copy over my save files from V1 to V2. So here’s what I did:
(Note: I have Onion OS installed on both devices, also the same emulators)
– Copied the roms to their exact folders from device 1 to device 2, maintaining their file names
– Copied the \states and the \saves folders into their respective RetroArch folders
– Started up a game that I had previously save files for
But nothing happens, the game starts from the beginning, as if there never was a save before. Manually loading a save file through RetroArch doesn’t work either.
So, HELP please! How can I get my save files to work on the V2 device? Thanks!
LikeLike
Hey Russ,
I installed the OnionOS v3.11.2 on my Miyoo Mini v2. The problem is that on the Miyoo Mini I can see all the hidden files when navigating through the interface. For example in NES section I can see the ._* versions of the games I added to the FT card so that the game count shows the double of actual games. And those hidden files with the names of actual games won’t even open.
I would appreciate your advice,
Thank you in advance
LikeLike
Per the wiki on OnionOS github, you can delete these ._* files. Most likely came from MacOS.
LikeLike
Hi eren,
I use mac and also had this issue. If you’re on mac, you can paste this into terminal and it will delete them:
dot_clean /Volumes/your_sd_card_name
got the info here: https://www.reddit.com/r/MiyooMini/comments/ujbdnp/new_miyoo_mini_and_mac/
LikeLike
Onion OS doesnt load some roms after following this guide.
GBA, FC, and SFC roms bring up a loading text then returns back to the Onion OS rom list. But if I Apps>RetroArch>Load Content>Navigate to ROM folder>Run rom with any core it works. I have verified the naming/path/capitalization is correct.
My GB and PS Roms work from the OnionOS Menu
I installed Onion OS on a fresh SD card and just copied the roms from the Stock SD over.
LikeLike
I reinstalled and seems to be working. not sure how i broke it originally tho.
LikeLike
hello I want to add ps1 games but when I add them with the same .pbp format it does not recognize them do you have any guide to be able to add ps1 games
LikeLike
I had better luck running PS1 games in BIN/CUE format. Probably, ISO format, too. PBP originally is the format that PSP runs for when emulating PS1 titles natively.
LikeLike
Today I got my Miyoo Mini V2 (Firmware is already 20220419 ) and wanted to install the newest onion firmware. I formated a new sandisk 32gb microsd card and copied the “.tmp_update file” to the root of the sdcard and put it back to the miyoo mini. After powering on the device the onion installation screen appeared but stuck in showing “Installing cores” for hours. Nothing more happened 😦
Afters 2 hours I disconnected the battery and tried to boot with the old microsd with original firmware.
Luckily this worked 😉
I tried with another sdcard, but same problem 😦
Any idea for help?
How long is the normal process when installing onion, How long do I have to wait till process is ready? Minutes or hours?
LikeLike
Hey!
New update of MINIUI was released: MiniUI-20220910
I’ve got a question…what does this mean? extras: renamed SFC.pak to SUPA.pak (for use with collated folders)
LikeLike
I’ve just updated my miyoo with onion and suddenly the roms and emulators are not visible when I boot the device? I just get an empty games page and nothing changes after I refresh the roms list. Has this been seen?
LikeLike
Any suggestions on the best screen protectors for the v2? Thanks
LikeLike
hi, im new to do this. i just got a miyoo mini v2 but without SD card from a third party. if i can get my own SD card will it be possible to download games onto my miyoo?
can anybody help me out with this?
thanks in advance! – Nick
LikeLike
Is there anything to consider when backing up the SD card? which program is best to use? thanks in advance. Dirk
LikeLike
I cannot seem to update the firmware of my Miyoo Mini v1 to the Mar 2023 firmwware.
I’ve used 2 separate downloads, used guiformat to format the 64gb card i had in there that was working on the old Onion OS i installed following your original video. Its a sandisk and brand new. I also formatted and tried a samsung 64i had lying around. I tried unzipping the file with 7zip, also tried basic windows extraction when that didnt work. across both cards that are basically new.
The device wont take the update. When i plug it in, it skips the update and goes right to the charging symbol for both cards. I tried plugging it into the PC and an old brick. It does everything normally except loading the .img file.
LikeLike
Hi everybody,
I am following the Miyoo Mini videos since months, hesitated to order a Miyoo Mini because it seems to be too small for me (and has not been available at any second ) and missed the first Keepretro pre-order.
Today, I saw the announcement that KeepRetro has (only white) Miyoo Mini + available, so I ordered! Totally looking forward to this! 😉
Coming to my question: is the bootlogo change also possible on the Miyoo Mini Plus? I am quite sure it is, but I am also afraid to do something stupid.
Thanks a lot for reply.
LikeLike
A small addition to the guide:
The Onion OS theming also allows you to install icons independently:
https://github.com/OnionUI/Themes/blob/main/README.md#console-icon-packs
LikeLike
Ugh! It says 4.1.4 is not compatible with Miyoo Mini+
So I guess I’m going to have to wait a little longer. 😦
Thanks for the guide anyway!
LikeLike
Version 4.2, which is compatible with the Mini Plus, is currently in development but is already available for download and installation while in beta: https://github.com/OnionUI/Onion/releases/tag/latest
LikeLike
Thanks for the quick reply.
I found updated firmware 202303262339 and installed it.
I also found Onion OS version 4.2. (Something something after that, but it goes by too quickly to read.
The Mini Plus will now no longer take a charge, and is below 50% battery strength.
So now what? :-O
LikeLike
Have you tried posting an issue about it on the OnionOS GitHub page?
https://github.com/OnionUI/Onion/issues
Also, try asking others at the Miyoo Mini Reddit, as well.
LikeLike
It turns out that not all USB C cords are considered equal.
The cable I have been using charges other things just fine. But it turns out that not all USB C cables are considered equal. Some are just for charging, while others are more all-encompassing — they don’t simply power some devices — they also send and receive data.
Anyway, I pulled out the cable they provided from the box the unit arrived in, and plugged it into the unit, which then sprang back to life.
LikeLike
Yes, some are intended solely for charging devices, while others are for charging and transferring data.
It’s good that you managed to isolate the issue with the cable.
I was really on the presumption that the issue being a critical bug with the CFW. Because someone previously posted on Reddit about having installed a non-4.2.X version of OnionOS on his Mini Plus, which resulted in him losing charging capability as you did.
LikeLike
guys, i tried to update official miyoo software, i draged files to sd card, turned on my console, with sd card. IT turned on, there was info about updating software, but i held power button for too long by mistake and device turned off during updating. Now it does not work. Lights on the top stwill works, but the screen does not turn on. It seems like my device bricked… Can somebody help me?
LikeLike
I have the same ROM issue, where no games reflect after transferring ROMS over. Anyone else have a fix for this?
LikeLike
If the ROM is in BIN/CUE format, convert it to CHD first.
LikeLike
Rather, you should refresh the system’s cache first by pressing the “Select” button from the Home menu and choosing the option to do so when it appears on the top portion of the screen.
LikeLike
Hi, should i use update file to my miyoo mini plus From this site or miyoo website? Actually i want install onion os after this
LikeLike
Depends on what Firmware your MIYOO currently is running on. If purchased recently, you probably don’t need to flash it.
LikeLike
Hello,
After the OnionOS 4.2 installation is complete my Miyoo Mini Plus freezes at the Miyoo splash boot screen and doesn’t boot to OnionOS. Stock firmware was at the latest version, 202305 something. Anyone else ran into this issue?
LikeLiked by 1 person
Are you sure you can install FinUI (Anbernic fork) on a Miyoo Mini Plus?
LikeLike
You mentioned Miyoo Mini V2. How do you find out if it is a V1 or V2 or even V3?
LikeLike
Got a typo in the Multiplayer section, “first, the video on the left will show you how to set up RetroArch netplay for either local or over-the-internet multiplayer, and the video on the left will show you…” should be Left, then – Right.
Love your content!
LikeLike
Hi Russ. Thank you for regularly updating this guide. I don’t know how you manage to do so many videos/reviews/guides and still put updates to existing stuff when things change. I bought a Miyoo Mini Plus on black friday deal as my first ever retro handheld so I look forward to using your guide to set it up!
LikeLike
hi is this guide updated for the miniv4?
LikeLike
Can the legendary PC game Captain Claw (Claw) (1997) from Monolith Productions be played on this system Onion on Miyoo Mini Plus?
https://en.wikipedia.org/wiki/Claw_(video_game)
LikeLike
So my miyoo mini plus I bought it off Amazon and all it says is miyoo does not say onion or anything like that it’s just really stinks because I’m not good with reading instructions so this is gonna take me a very long time to update. Hopefully I can find a video where they do step-by-step instructions.
LikeLike
I forgot I have a Steamdeck steamdeck, and I was wondering where that program work on the miyoo mini plus because I do notice that it runs off Linux like the steamdeck.
LikeLike
Hey Russ. Great guide. I did get stuck at one point and after working through it, thought it might be a good note to add. In my case I was using a flash disk that had a GPT partition table on it instead of the MBR partition table. Because of that, when attempting to use the guiformat tool to format the drive, it kept popping up an error saying the drive was in use. I did some digging, and that is when I came across a note somewhere talking about the partition table type. Then after following the guide below, I was able to convert it to an MBR partition table and then everything worked as it should. Just thought it might be worth adding a note or at minimum adding it to the comments here incase it helps someone else.
https://learn.microsoft.com/en-us/windows-server/storage/disk-management/change-a-gpt-disk-into-an-mbr-disk
LikeLiked by 1 person
Hello Russ,
Thank you for this excellent information. I bought the Miyoo Mini Plus for my 10-year old and this guide has been a lifesaver for setting it up. Thank you. If you have time, can you please post a list of essential ROMs that I should copy over from the stock that are friendly for a 10-year-old with limited gaming experience? I am planning to install MinUI for her but don’t know which ROMs to add. I have zero gaming experience myself. Thank you!
LikeLike
Thanks so much for your videos and blog. I finally got skin in the game with a Miyoo Mini + and immediately installed MinUI via your guide. I’m very much enjoying Golden Sun! The only issue I’m now running into is that when I transfered the “EasyLogoTweak” folder to “Tools” on my device, once it was done copying it disappeared and my entire micro SD card changed to read only and I can’t change it back to read/write. Now I can’t try to re-add LogoTweaks and I can’t add more games. Any idea what’s happening here?
LikeLike
Loved the walkthroug, was so great!
But for some reason I’m having issues adding a game file for GBA. Looking to add the Barbie Secret Agent Royal Jewel.
I’ve tried adding the ROM but feel I might be missing something, Would love some help!
LikeLike
Hi, Russ. There is any Batocera OS for the Mini Plus? Thamks for your work!!!
LikeLike
Is it possible to get wifi working on the Mini Plus using MinUI?
LikeLike
im looking to get one but i dont know how or where to buy the roms
LikeLike
Most people get ROMs for free illegally, but if you do want to buy ROMs, you can either get them by dumping them from an original cartridge/disc, or you can find homebrew (new and indie) ROMs on places like itch.io. In rare cases publishers like Sega will also put old games – ROMs included – on places like Steam.
LikeLike
For newer buyers, there is a “Miyoo Mini 4.1” that has a firmware issue that affects scaling. Fortunately it has a pretty simple fix in Onion OS: https://www.reddit.com/r/MiyooMini/comments/1foa1vo/comment/loscwj2/
You can tell if you have the newer v4 if the version number is printed directly on the plastic on the back of your device, and not on a label.
LikeLike
Hey Russ, love your stuff.
I’ve been working on a silicon Mac the entire time I’ve followed you. I’ve redone my Miyoo Mini Plus with Onion, my TrimUI Brick with MinUI and PakUI, dual booted my Flip2 with rocknix, and my Anbernic RG35XX. I had them perfectly set up for months/years until I wanted to give some tailored to friends, specifically my Brick and Plus. Terrified to touch my Flip or Anbernic at this point.
BalenaEtcher says there’s a partition table problem, and SD Card Formatter almost works, I got PakUI to boot twice until it did not anymore.
What the heck am I missing? I follow your guides head to toe, do I just need a windows machine at this point?
LikeLike