

Last updated: 03APR2026 (see Changelog for details)
We’re seeing a lot of new dual-screen Android handhelds release this year, including the AYN Thor. Setting one up is mostly the same as any other Android-based handheld, with a few key differences relating to that dual-screen functionality. This guide will cover all those special dual-screen considerations and serve as a complement to my greater Android Handheld Starter Guide.
Table of Contents

Compatible handhelds (and others)
Stylus recommendations
Ergonomic grips and other accessories
Setup roadmap
Preparing your ROM files
Nintendo DS
Nintendo 3DS
Nintendo Wii U
Other Systems
Frontend launchers
Other apps
Consider Linux

Changelog
Compatible handhelds (and others)
There are a number of different Android dual-screen handhelds out right now, and more likely on the way. This guide was written with the AYN Thor in mind, but other options include the ONEXSUGAR, AYANEO Pocket DS, and the Retroid Dual Screen attachment (or any other monitor setup, really).
Fundamentally, they all behave the same. You have a primary display, and then the software detects that there is a secondary display attached. In the case of the AYANEO Pocket DS and the Retroid Dual Screen attachment, the bottom screen is recognized as the primary display and the top screen is external; on the AYN Thor it’s the other way around, where the software thinks of the top screen as its primary display. This is a minor difference but may require you to assign a specific window to a certain screen in emulator settings (i.e. the “external” display in MelonDS could be the top or bottom screen depending on your device).
Stylus recommendations
Because dual-screen handhelds excel in playing 3DS and NDS games, you may be interested in getting a stylus for your handheld. It’s worth noting that these modern (capacitive) screens have a different touch input than the original DS and 3DS (resistive) screens. You can’t use a DS/3DS stylus on a modern display. Instead, you’ll have to use a rubber tip, disc or active pen stylus, and each of them provide their own unique feel (and shortcomings). Here is a video I made testing out a bunch of stylus options:
Long story short: my preferred stylus is a mesh tip, and the two commercial options I like the best are the Mixoo stylus and the Nintendo Switch touch pen.
There is also a new handmade option available on Etsy, I have tested this one and I think it’s more accurate than the ones I tested in the video above, and it is of similar size to the original DS/3DS stylus options. You can find it here, and use code RETROSTYLUS for 30% off.
Ergonomic grips and other accessories
Let’s face it. Dual-screen clamshell handhelds are pretty amazing in many ways, but their ergonomics are somewhat squarish and cramped. Grip accessories can improve the ergonomics a bunch, at the expense of adding bulk to your device. The video above will walk you through some of my favorite grip options for the AYN Thor.
Finally, an important accessory for your handheld will be a microSD card to expand your storage. I recommend using a card from reputable brands like SanDisk or Samsung to use in your device, for the fastest and most stable performance.
In general, I recommend the cards listed below. The prices fluctuate all the time, so keep an eye out for deals. A 128GB or 256GB card will allow you to load EVERY 8-bit and 16-bit game out there, just all of the arcade games that work, and quite a few CD-based games (those systems have the largest file sizes). A 512GB or 1TB card will allow you to store even more of those larger games.
128GB cards:
Samsung EVO Select
SanDisk Ultra

256GB cards:
Samsung EVO Plus
SanDisk Ultra
If you don’t have a nice microSD to USB adapter, you might want to think about getting one. This allows you to plug a microSD card into your computer to transfer files. A nice adapter like this one from Anker will give you the fastest transfer speeds possible, and can be used with USB-A or USB-C ports. Their USB-A version is also great.
Setup roadmap
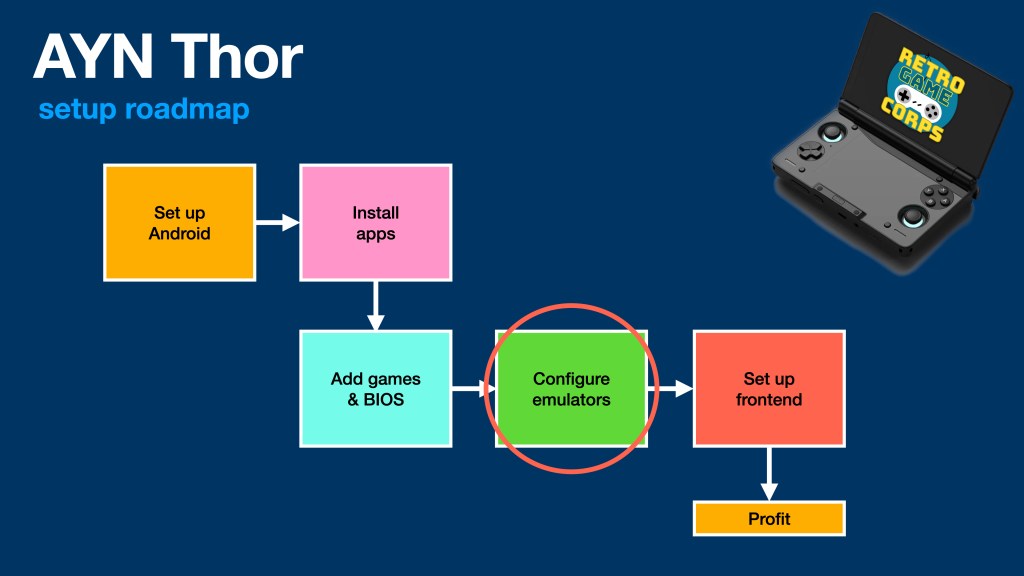
Setting up a dual-screen device will generally be the same as any other Android-based handheld, with the exception of some special dual-screen features. I have a full Android starter guide which will cover most of your bases, and much of that original guide is replicated here. If you run into any issues, that other Android guide may have the solution you are looking for.
Preparing your ROM files
For starters, you will need a place to store your ROM files. I recommend using my ES-DE Directories collection which will add a standard file structure to your device. That way you can simply drag and drop your ROM files into their corresponding folders, and it will work seamlessly with frontends like Cocoon, ES-DE, and so on. To set it up, just download the latest release, unzip it, and put the ROMs folder (and its subfolders) in your microSD card (or internal storage if you want to host your games there).
In order to get the best experience with our dual-screen setup, we should prepare our ROM files to give us the best compatibility and smallest possible file size.
Nintendo DS: Your game files should be in a .nds file format. Both MelonDS and DraStic can read these files when they are zipped, which will reduce their overall size. So I would recommend compressing your .nds library into .zip format instead. You can use tools like 7Zip on your PC, or do this directly on your Android device. To do it on the device, browse to your NDS folder with the Files app, then long-press on the .nds file and select “Compress”. This will make a zip file of your game and you can delete the .nds file at that point.
Nintendo 3DS: The Azahar and Citra MMJ apps require your games to be decrypted .3ds files, and they can also be in the .cci file format. The Azahar app can also create and load compressed .zcci files, which can reduce the file size by about 25%. Unfortunately Citra MMJ cannot load .zcci files, so if you want to use both apps you should stick to .cci or .3ds instead.
Wii U: For Wii U files, I recommend using .wua files, which are compressed and contain the game, updates, and DLC all in a single file. I discuss how to set this up in my File Compression Guide.

For all the other (non-dual-screen) systems, they are listed in the Android emulation starter guide. You may also want to consider compressing some of your larger files to save on space.
In the image above you can also see some of the common BIOS files that are required for certain systems to function properly.

Nintendo DS
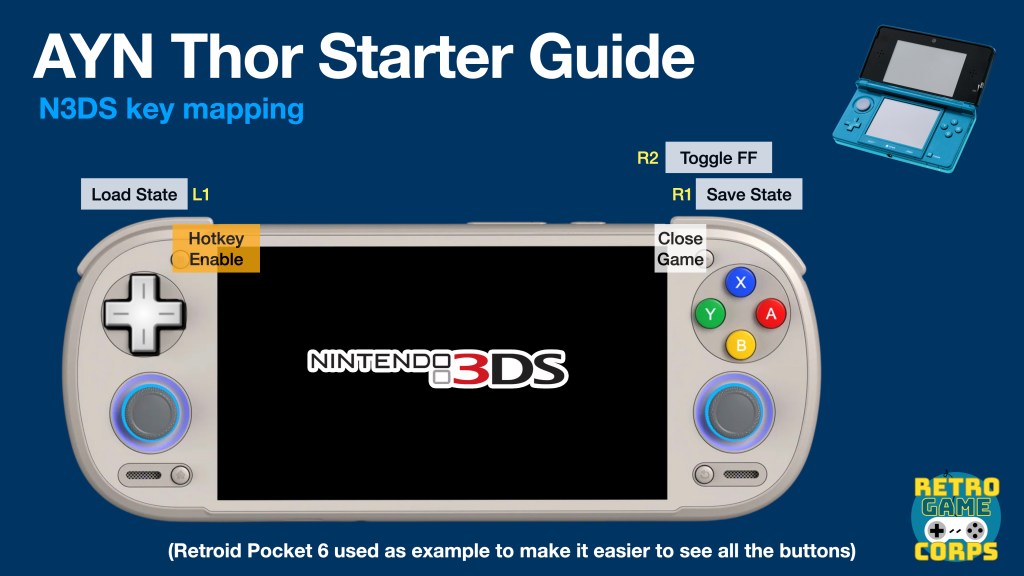
For Nintendo DS, we have two major emulator options on Android: MelonDS and DraStic. For many years, DraStic was the premier Nintendo DS emulator on Android. Unfortunately it is no longer in development and no longer available on the Google Play Store, and it lacks some key features necessary for excellent dual-screen gaming. MelonDS is currently in development and is frequently adding new features like high resolution scaling. I generally recommend MelonDS, but DraStic setup information is also provided below.
MelonDS
As of making this guide, the official MelonDS app does not have dual-screen support. Thankfully, a community developer has created a fork of the official version that has dual-screen support. The developer’s goal is to get these changes integrated into the official version of the app, but for now we’ll use the fork instead. There are nightly and stable releases of the MelonDS fork; both run well, but the nightly version may have additional features and compatibility fixes (and additional bugs). For this guide we’ll use the stable version, but the setup process for the nightly version is the same.
Download the latest release of MelonDS fork either directly from their GitHub or via the Obtainium emulation pack (in its dual-screen section). I recommend the stable (non-nightly version). Open the app and tap on “Select ROM directory” and navigate to the folder where you have all of your ROM files. Select “use this folder” and confirm, and now your game list will appear in the app.
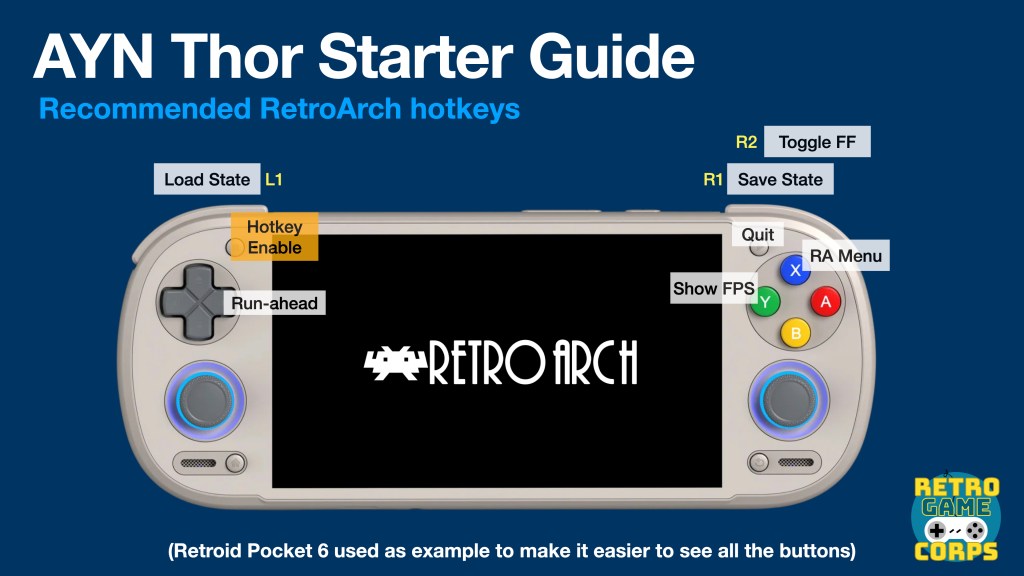
- Tap on the top right menu icon (three dots) and choose Settings. I recommend the following video settings changes:
- Video > Renderer > OpenGL
- Video > Internal Resolution > 4x (or whatever matches the chip and screen on your device)
- Video > Filter > LCD (optional, provides a grid layout similar to the DSi XL)
- Video > Dual Screen Presets > Internal: Top, External: Bottom (for the Thor)
Next, go into the Input settings and tap on “Key Mapping” to map your controls (on some devices it will already be mapped for you). Note that you can map multiple inputs. For example, you can map both the d-pad and analog stick to the same direction (you just need to map them each separately). I like to map Fast Forward (Toggle) to R2. Also in the Input settings be sure to turn the Soft Input Behavior to “Always Invisible”.
DraStic
While DraStic does support dual screens, the touch functionality may not work on some devices like the AYN Thor (see note in the box below). This renders the app only useful for games that don’t require a touch input. If you want to try it, you’ll need to download the app and sideload it onto your device. Archives of the app are available on APK Mirror and Archive.org, and you can navigate directly there on your handheld.
- APK Mirror: grab the arm64-v8a APK version.
- Archive.org: click on the “Android Package Archive” link to download
Once installed, tap on the app to open it. At the first prompt you will be asked to create a desktop shortcut, I recommend declining. Tap on “Load new game” and navigate to the folder where you have all of your ROM files. Select “use this folder” and confirm, and now your game list will appear in the app.
- Go back to the main menu, and select “Change options”. I recommend making the following changes:
- Video Settings > Frameskip > None
- Video Settings > Filter > None (optional, will make games look sharper)
- Video Settings > High Resolution 3D Rendering > ON
- Video Settings > External Display Mode > Correct Aspect Ratio
- Video Settings > External Display Screen > Bottom Screen
- Video Settings > External Display Border > 0%
- External Controller > Select Key Mapping > No Mapping (then tap on “Map Control” and input all the controls). Do the same with “Map Special” to map hotkeys like screen swap to your liking
- External Controller > Disable mapped keys in overlay > ON
- General Settings > Show FPS > ON (optional)
- General Settings > Default Layout > Landscape Aspect
Once you have configured these settings, exit the app and restart it, then start up a game.
Not getting touch input? There is a new version of DraStic that does enable touch input on the AYN Thor’s bottom screen, and you can find it here. This app also pre-loads a bunch of custom shaders which are nice (I prefer the LCD1X shader). To configure the app, select these options in lieu of those listed above:
Video Settings > External Display Mode > Correct Aspect Ratio
Video Settings > External Display Screen > Bottom Screen
Video Settings > External Display Border > 14% (or 15% for a very slight black border on each side)
You’ll need to restart the app to see the changes applied.

Nintendo 3DS
There are two main apps for 3DS gaming on Android: Azahar and Citra MMJ. Citra MMJ is more performance-focused but Azahar is more accurate. Neither app is perfect, and some games will run better on one emulator over the other. This guide will show you how to set up both apps so you can swap between them if you would like.
Azahar
Azahar is the primary app I use for 3DS, because it has an active and engaged development team who keep adding new features and functionality. It is also a highly accurate emulator. To install the app, you can grab the latest version from their releases page (“android universal apk”), or from the Obtainium emulation pack.
Open the app to start the setup process. Confirm all the permissions requirements it needs to function, then in the Data Folders section, choose a place for your User folder (this is where you’ll find your save files, configs, etc – you can put it anywhere, even in your 3DS ROMs folder). Your “Applications” folder is your ROMs folder, so navigate to that folder and allow it access. You’ll get a prompt about how .3ds files are no longer accepted, and then your game list will appear.
Click on the menu (three dot) icon on the top left, and then choose Settings. I recommend the following configuration:
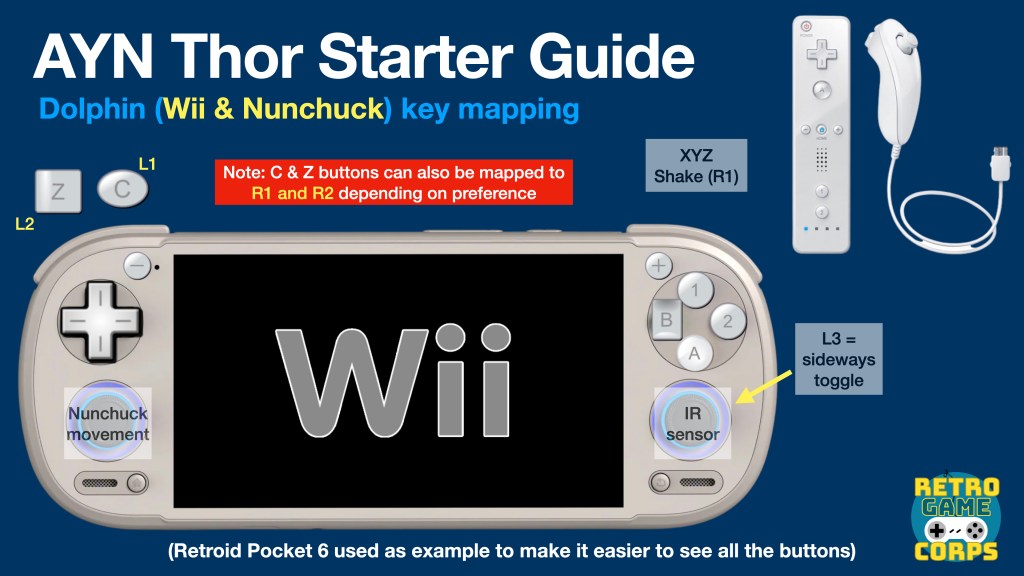
- Gamepad > configure your buttons as you like, using the Auto Map function (see chart below).
- Graphics > Graphics API > Vulkan
- Graphics > Enable asynchronous shader compilation > ON
- Graphics > Internal Resolution > 4x Native (or whatever matches your device chip and display)
- Graphics > Disable Right Eye Render > ON (may cause flickering in some games)
- Layout > Landscape Screen Layout > Single Screen
- Layout > Secondary Display Screen Layout > Bottom Screen
- Layout > Performance Layout > adjust as you’d like (optional)
- Debug > Enable V-Sync > OFF (improves input latency)
Once you start up a game, the controller overlay will appear. Press the Back button on your device to enter the quick menu, then go to Overlay Options > Show Controller Overlay > OFF.
Other tips and tricks:
- If you’d like (and if your device supports it), you can use custom GPU (“Turnip”) drivers with this app, which you can load via Options > GPU Driver Manager. I have found that custom drivers for devices like the AYN Thor don’t seem to provide any additional benefit over the stock GPU drivers on the device.
- You can long-press on the game and choose the rightmost icon to create a game shortcut that will appear on your Android desktop. From there you can tap on the shortcut to launch the game directly.
Citra MMJ
Citra MMJ is a performance-minded app that will sometimes implement workarounds to ensure the best performance on your device. These tweaks may introduce other issues with your gameplay, so it’s always best to experiment with both Azahar and Citra MMJ to find the best experience with any particular game. My rule of thumb is to start with Azahar and then jump into Citra MMJ if the Azahar experience isn’t great.
To install the app, you can grab the latest version from their GitHub releases page or via the Obtainium emulation pack. They have multiple versions: Citra MMJ, Antutu, and storage access. I generally use the “Storage Access Antutu” version since that gives me the most freedom to find my config files and the Antutu version may give you the best performance too (it tricks the device into thinking it’s running a benchmark app to force the best performance from your machine).
Once installed, tap on the app to open it. Tap on the green box that says “Add folder to Library”, then navigate to your 3DS ROMs folder. Select “User this Folder” the confirm, and after that your games will appear in the games list.
Click on the menu (three dot) icon on the top right, and then choose Input Binding, and map all of the buttons on your device. Back in the main menu, click on the Settings icon on the top right, and make the following changes:
- Screen Layout > Single Screen
- Internal Resolution > 4x (or whatever matches your device chip and display)
- New 3DS Mode > ON
Once you start a game, it will automatically function with both screens, that’s pretty handy. But it will also show the controller overlay; to remove that, tap on the Back button on your device and select Settings > Hide Input Buttons > ON. While still in the Quick Menu Settings, go to Asynchronous Shader Compilation > ON.

Nintendo Wii U
While most of the catalog didn’t take advantage of the Wii U’s unique gamepad functionality, there are still quite a few games that work great in a dual-screen setup. Many will have a simple quick menu on the secondary display, but others like Star Fox Zero use the second screen as a key game mechanic.
Cemu is the only viable Wii U emulator option on Android, and it is still in an early experimental status on the platform. Unfortunately the official build does not have dual-screen support. Community developer SapphireRhodonite built a fork of this app that includes dual-screen gameplay as an option. That’s the fork we’ll be using for this guide.
To install the app, you can grab the latest version from their releases page, or from the Obtainium emulation pack (in its dual-screen section).
Once you have it opened, tap on the menu (three dot) icon on the top right, then select Settings. From there, go into General Settings > Add game path, then tap the “+” icon on the top right. Navigate to where your Wii U games are stored and select “Use this folder” and confirm. The games should now appear in your main menu.
Go back into the Settings section and go to Input settings. Select Controller 1 > Emulated Controller > Wii U GamePad. Now tap the “Setup all inputs” button, choose your device controller, and all the buttons should be mapped properly (maybe check the ABXY mapping to ensure they are correct, just in case).
Also in the menu (three dot) section there is a Graphics Pack option. Go in there, tap the download button on the top right to download and install the latest graphics packs. I would recommend going into the graphics packs for each of your games and see if there are any configurations that will enhance your gameplay experience.
Once you launch a game, swipe from the left on your screen to bring up the Cemu quick menu. Turn ON the “Show Pad” and “External Pad Screen” toggles and you should see the secondary screen appearing on the bottom. If it’s just a duplication of your primary screen, chances are that game doesn’t have a dual-screen feature.
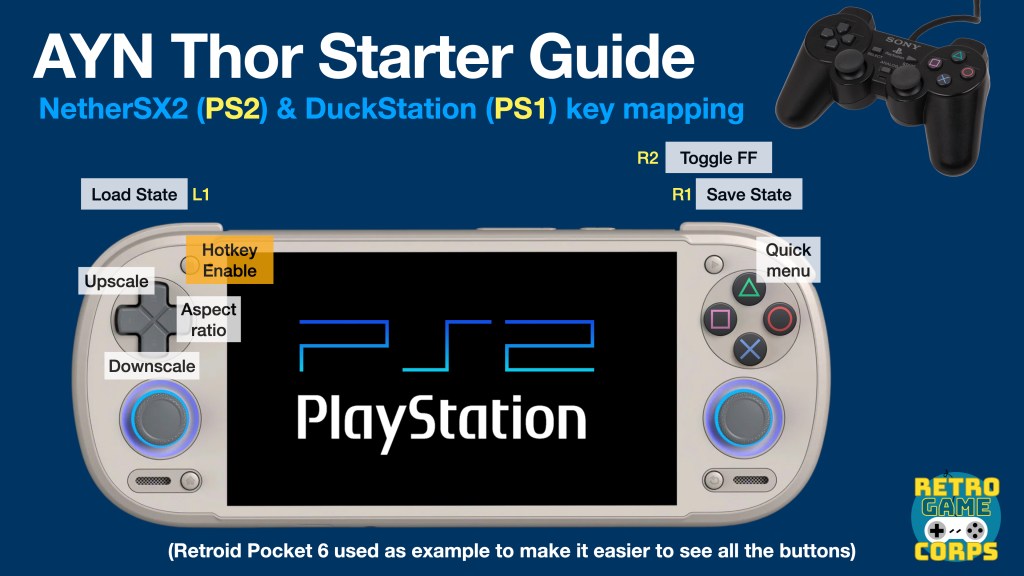

Other systems
Setting up the other systems will be identical to my standard Android Emulation Guide process. Above are the controller mappings that I would recommend for specific emulator apps, which are explained in my Thor Starter Guide video.
Some unexpected apps may feature dual-screen support in the future too. There is an experimental fork build of PPSSPP that allows you to present a zoomed-in section of the main screen on the bottom screen. This would be handy if you wanted to show an enlarged mini-map on your secondary display for games like GTA.
Frontend launchers
Frontend launchers wrap together various emulator apps into a single navigation experience, providing a console-like feel to this hodgepodge of apps and settings. Single-screen frontends will work great on dual-screen devices, but some developers are building specific dual-screen functionality into their products. Here is a rundown of our current options.
Cocoon
In the video guide above, I walk you through the Cocoon setup process (it’s also briefly demonstrated in my Thor Starter Guide video). This is my preferred launcher for dual-screen devices, because it nicely replicates a 3DS-like experience, and is completely free.
EmulationStation-DE
ES-DE is usually my preferred launcher, but it is more focused on a single-screen experience. There are tools like ES-DE companion app which will provide a rudimentary dual-screen setup, and you can see it in action in this video. If you want to set up ES-DE, I would recommend my recent Retroid Pocket 6 starter guide, which will walk you through the process.
Console Launcher
This app has been around for a while, and it provides a really clean navigation experience while also integrating in your emulation library. Their official release on Play Store hasn’t been updated in a while, but the latest Beta release from their GitHub has recently added dual screen support.
To install, grab the latest Beta release from their GitHub page. When you start up the app, it will walk you through the onboarding process. You can choose whatever you’d like, but this is what I chose when setting up the AYN Thor:
- Set Console Launcher as your default launcher > NO (you can do this later)
- Home Screen focus: Game Icons (or whatever you’d like)
- Kind of games: Retro (or “Both”)
- Icon Image Style: Steam Grid DB
- Find Platforms > navigate to your ROMs folder
- RetroAchievements > log in if you’d like
After that, the app will scrub your ROMs folder, and as long as the ROM directories are named in a standard way (NDS = Nintendo DS, etc), it should find all of your files and scrape the box art. From there, you can navigate your game directories and launch your games. The first time you launch a game it will prompt you to read instructions on how to set up each emulator, you can skip this if you’d like.
iiSU DS
iiSU is an upcoming dual-screen focused emulation frontend. It’s currently in alpha (and lacks some promised features right now) but they have public releases so you can try it out yourself. The app is intended to be free once it is finished, but you can donate to their Ko-Fi page for early access to future builds until then.
Beacon
Beacon Game Launcher is also an excellent, simple frontend, that allows you to pull images from SteamGridDB. This app works great with dual-screen handhelds, but will only show one screen at a time (which honestly is great for multi-tasking). So even if it isn’t specifically made for dual-screen devices, it’s still an excellent option.
Daijisho
Daijisho is a free frontend that can provide a clean interface. Like with Beacon, it’s not specifically made for dual-screen handhelds but it still works fine.
Other apps
Thanks to the cottage industry surrounding dual-screen handhelds, new apps have been popping up to improve the user experience.
- DS Keyboard – this free app will let you add a full-screen keyboard to your device, or RetroArch shortcuts. It was made with the AYN Thor in mind but it may work with other devices.
- Bifrost – this app is a custom LED controller for the AYN Thor, which includes features like Ambilight (colors adapt to what’s on the screen), audio reactive lighting, and more.
- Jarngreipr – this is a customizable launcher for the AYN Thor that allows for multiple screen modes, advanced app management, and widget support. It is meant to be used with Mjolnir.
- Mjolnir – this app turns your AYN Thor home button into a powerful automated tool.
- Pixel Guide (Android) – a clean, offline game guide reader that works great for multitasking (play the game up top, consult the guide down below).
Consider Linux
Some dual-screen handhelds, like the AYN Thor and AYANEO Pocket DS, can run a special Linux distribution called ROCKNIX. Above is the video guide, and here is the written guide accompaniment.
Changelog
03APR2026
– updated to match AYN Thor Starter Guide video release
– added Cocoon video guide, Linux guide, and more
27DEC2025
– updated iiSU links
– added grips section
– added other apps section
03NOV2025
– added link to DraStic version with Thor bottom screen touch support
27OCT2025
– published guide

