

Last Updated: 27DEC2021 (see Changelog for details)
The Anbernic RG552 is a unique device in that it can boot into both Linux and Android, giving users a wide variety of use cases. In this guide we’ll go over some of your options when it comes to the Linux operating system, including a pre-configured SD card image that you can download and use directly on your device.
Some caveats:
- The Linux operating system that ships with the device is a modified version of Batocera v29. Several development teams (including the official Batocera team) are already hard at work on updated firmware that will improve the user experience. This guide is meant to be a stop-gap while we wait for proper updated firmware.
- This guide will show you how to install a pre-configured SD card image you can simply flash an SD card that has all of the changes baked in.
- I DO NOT recommend flashing this SD card image over your existing 16GB card that came with the device. Keep that one around for safekeeping; instead, I recommend using a SanDisk Ultra 16GB card because it is more reliable and can be found for under $10.
- If you don’t want to flash a new SD card image, I will also link to a shell script that will provide most of the tweaks to your existing stock firmware.
- Once custom firmware is available, I will likely NOT recommend using this guide, since updated firmware will likely improve the user experience as well as emulation performance.
- This updated image will include optimized hotkeys, auto save/load for most systems, scaling, and aspect ratios, plus the ability to download new themes.
- Big thanks to developers FGL82 and konsumschaf for help with dialing in the proper settings, and TheGreatCrippler for helping shrink down this image to a manageable size.
For now, I would focus on using the Linux interface for PS1 and below gameplay. The emulators on the Android OS side are much more optimized and will give you better performance across the board. Custom firmware might make Linux more performative in the future, but for now I would use Android for Nintendo DS, Dreamcast, PSP, Nintendo 64, Panasonic 3D0, Atari Jaguar, and Nintendo GameCube.
So without any further delay, let’s jump into it.
TABLE OF CONTENTS

Pre-configured stock Linux image
Configuration shell script
Backup version of stock Linux firmware
Setting up a second SD card image
Hotkeys
Adding additional themes
SNES + NES scaling recommendations
Scrape media for your games
Notes

Changelog
Pre-configured stock Linux image
The easiest way to get a nicely tuned Linux firmware is to simply flash my pre-configured image onto a new microSD card. This is the latest release of Anbernic’s firmware image, which contains the audio latency improvement. I recommend flashing this image onto the following 16GB microSD card:
SanDisk Ultra (16GB)
Note that this pre-configured Linux image does NOT have BIOS files, but it’s easy to grab them from your old card (instructions below).
- Insert your old 16GB SD card into your PC, and make a copy of the BIOS folder found inside the GAMES partition. If you have any save games you’d like to move over to the new card, grab them from the SAVES folder as well.
- Download and unzip this SD CARD IMAGE, then insert your microSD card into your PC or Mac
- Use an SD card flashing tool like Balena Etcher (available for Mac & PC), Win32 Disk Imager, or Rufus to flash the card image to the SD card.
- Resize the GAMES partition to its maximum size possible using DiskGenius (PC) or Disk Utility (Mac). Watch the video for a demonstration.
- Copy the BIOS files into the BIOS folder on your new card (and same if you copied any save games)
Configuration shell script
Developer konsumschaf created this handy shell script that will automatically set auto save/load and all of the hotkey, scaling, and aspect ratio settings for you. Note that this won’t pre-configure the standalone emulators like PSP and Nintendo DS like on the pre-configured SD card image above, so you’ll have to do those on your own. This is a great option if you don’t want to flash a new SD card image but want new settings without having to figure it out yourself.
- Download and unzip this SHELL SCRIPT.
- Place the .sh file into the PORTS folder of your SD2 card
- Start up the device, navigate to the Ports section, and then run the “Settings” option within. This will shut the device down. When you start up the device again, your settings will be changed.
Backup version of stock Linux firmware
If you would like to simply install the stock firmware onto an SD card without any pre-configurations, here is the image:
- Head over to RGHandhelds’ RG552 repository and download the latest Linux clean stock image.
Setting up a second SD card image
If your device didn’t come with a second SD card, or you want to make your own, it’s pretty easy to set it up. The stock Linux firmware has a handy tool where it will automatically create all of the necessary folders for you if you place a microSD card into the second slot. This will work with cards that are exFAT or FAT32 formatted. While exFAT is more stable, I recommend using FAT32 formatting for now because the stock Android firmware on this device cannot read exFAT partitions. So until we have a new Android image, it’s best to use FAT32 so that you can use the same SD card in the second slot for both Android and Linux.
These are the cards I recommend for your SD2 card:
128GB cards:
SanDisk Extreme
Samsung EVO Select
Samsung Pro Endurance (more reliable but pricey)
SanDisk Ultra

256GB cards:
Samsung EVO Select
SanDisk Ultra
Instructions:
- Format the SD2 (external) card to FAT32
- If using Windows, use the guiformat tool to format the card to FAT32. You can name it whatever you want.
- If you have a Mac, “Erase” the disk using the Mac’s built-in Disk Utility app, with the format MS-DOS (FAT), name it whatever you want.
- Insert the SD2 card into your device, boot the device up, and then shut it down within the game menu. Now place the card back into your computer, and you should have all of the populated folders.
Hotkeys
Here are the hotkeys that I’ve set in these pre-configured settings. Note that on the Linux OS side, I have basically removed the need for the Function (F) button on the bottom of the device, because it is too near the RESET button.
SELECT + START = quit game
SELECT + Y = show FPS
SELECT + X = RetroArch menu
SELECT + A = pause game
SELECT + B = reset game
SELECT + L1 = load state
SELECT + R1 = save state
SELECT + L2 = rewind (when enabled)
SELECT + R2 = toggle fast forward
SELECT + L3 = toggle runahead (improves input latency on some systems)
SELECT + R3 = take a screen shot
Adding additional themes
This image will contain a number of new themes, many of which are pretty nice on this device. If you’d like to install additional themes, simply go to the Updates & Downloads section in the Main Menu, then select Themes, and download them from there (note that an internet connection is required). You could also grab them from this repository, unzip the file, and place the folder inside the THEMES folder within the GAMES partition on your SD card. You can find the themes in the Batocera menu under UI Settings.
SNES + NES scaling recommendations
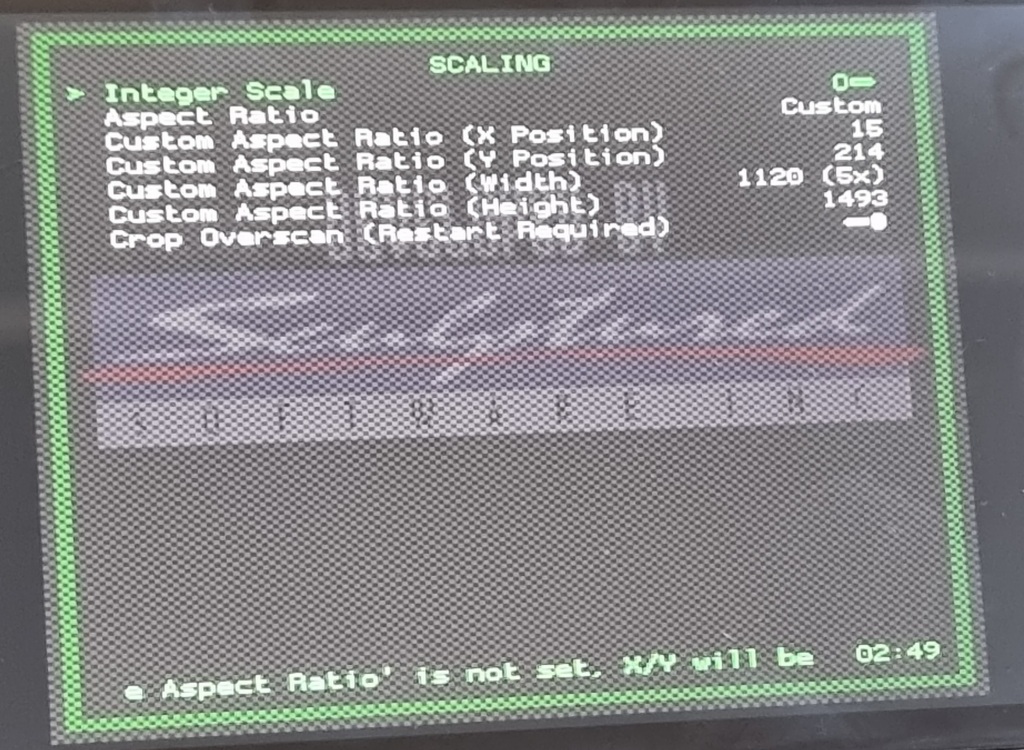
Developer FGL82 (who created the amazing SimpleMenu frontend for RG350/280 devices) noted that vertical integer scaling for SNES at a 4:3 aspect ratio requires custom settings. This will give a 4:3 image at 5x scaling for SNES and NES games, and has been added to the preconfigured SD card image.
Aspect Ratio: Custom
Custom Aspect Ratio (X Position): 15
Custom Aspect Ratio (Y Position): 214
Custom Aspect Ratio (Width): 1120 (5x)
Custom Aspect Ratio (Height): 1493
Crop Overscan: ON
Scrape media for your games
If you are interested in scraping media for your games, you can either use the built-in scraping tool in Batocera, or do it yourself on your PC. The video above will walk you through how to add your own media.
Notes
Some random notes about this stock Linux firmware:
- It does not support sleep mode.
- The PlayStation menu doesn’t show .cue files, so if you are using bin/cue files that have multiple bin files, I recommend using .pbp format games instead.
- You cannot change the volume within the Linux PSP emulator. Prepare for it to be really loud. Press SELECT + B to open the PPSSPP menu. From there, you can go to Settings > Audio > Global volume and lower the volume there instead.
- To bring up the DraStic (Nintendo DS) menu, press the MENU button on the bottom of the device. Note that you have to move the cursor around to see anything, and the cursor won’t highlight with every button press. It’s a pain to navigate.
Changelog
27DEC2021
– published guide
– updated the link to konsumschaf’s GitHub

how can i update the firmware of rg552 android to the new one using macos? so far i got through the linux setup thanks to ur guide.
thank u.
LikeLike
I started following your channel and that you make a lot of very informative videos. Im new to the whole retro handhelds and just wondering if it would be too much to ask to ask for help playing older games on linux the way you set your RG552. Im not computer savy in a lot of ways. Also, for some reason i cannot find any super mario games at all from my stock sd. Maybe you can help me figure it out. Thank you in advance.
LikeLike
Can you supply a copy of the file directories used for the flash card housing the roms? There are some unusual names for some of the directories, and some of us might accidentally delete those. Cough cough.
LikeLike
Are you going to do an update video once the firmware is updated, fixed or a custom one is created?
LikeLike
Great guides Russ! I’d be lost without you. I had previously seen a link to download the 351Elec beta for the RGG552 but when I click on it now Github says “Page cannot be found”. Did they take it down? I know there had been a number of updates to the beta since the first version came out but I hadn’t downloaded one yet.
LikeLike