

Last updated: 06JUL2021 (see Changelog for details)
At long last, we have an official RetroArch build for OpenDingux devices, which includes the Anbernic RG350 and RG280 series of devices.
This app is a long time coming; an experimental port of RetroArch was released in January 2020, and then picked up again by RetroArch developer jdgleaver a few months ago. You may recognize that name, because this is the same developer who has recently given the OpenDingux community new versions of ReGBA (Game Boy Advance) and PCSX4All (PlayStation 1) emulators for the RG350 devices. These two emulators by far are my favorites on the RG350/RG280, so I was excited to see what the RetroArch team came up with, and I have to say that this version of RetroArch runs super clean and efficiently.
In addition to the Anbernic devices (RG350, RG350M, RG350P, RG280M, and RG280V), this RetroArch build should work on other OpenDingux devices, like the GCW Zero and the Bittboy PocketGo v2. Note that this version of RetroArch works on both STOCK and BETA OpenDingux firmwares, and performance is greatly enhanced on the BETA firmware.
So let’s dig into this guide, and show you how to rock RetroArch on your device.
Table of Contents:
What is RetroArch?
Supported systems
Install RetroArch
How to launch games
Creating playlists
Playlist thumbnails
Adding cheats
Set up hotkeys
Set as default launcher
Updating RetroArch
RG350 RA installer
Sichroteph's "DeepSleep" script
50Hz compatibility
Recommended per-system settings

Changelog
What is RetroArch?
RetroArch is a frontend for emulators, game engines and media players. It can run on the usual platforms like Windows, Mac OS X and Linux, but it also runs on iOS and Android for tablets and phones, as well as on game consoles like PS2, PS3, PSP, PS Vita, Wii, Wii U, 2DS, 3DS, Switch, and more. On the RG350/280 devices, RetroArch works as a universal emulator system. You boot it up, and then run your games like you would any other emulator.
So you might be asking yourself, why should I bother with RetroArch for my RG350 or RG280 device, if I already have emulators installed that will play my games? That’s a fair question. The answer is that RetroArch contains a lot of universal features that are not implemented in many of the other emulators. For example, with RetroArch, you can unlock the following features:
- Universal cheats. If you check out my Ultimate Cheats Guide, you’ll see that a lot of the standalone emulators don’t support cheats — you really only have them for NES, Game Boy/Color, Genesis, and PS1, and even those are mostly through a cumbersome Game Genie process. With RetroArch, you can simply add the appropriate cheat files and access all of the cheats from the RA menu.
- Universal button mapping. You can set your buttons for any RA core, and also save per-game settings for the best experience. You can also set up hotkeys for things like save states, loading save states, bringing up the RA menu, fast forward, etc.
- Auto frame-skip. For the first time ever, RetroArch has been able to implement auto frame-skip into its RetroArch cores, as a direct result of development for the RG350 devices. This means that the frame will skip based on audio buffer occupancy, allowing you to have a smooth gameplay experience without audio crackling. This feature has now been implemented in a variety of RA cores for all of their supported systems, so the whole emulation world is now benefitting from the RG350’s development!
- Filters. Filters behave like shaders for your games, and can alter the screen to provide you a better visual experience. This is especially useful for the RG280M and RG280V, which have a weird screen dimension (320×480 half-height pixels) that can create pixel distortion. Adding filters to your game image will smooth out those distortions. Like with auto frame-skip, the RetroArch team was able to make improvements across the board thanks to their development for the RG350.
- Playlists and thumbnails. RetroArch uses “Playlists” to organize the game library, and it will allow you to add box art (“Thumbnails”) to every game as you scroll through, and you can also set favorites, which is very handy.
- Configurable interface. This version of RetroArch comes with just one theme (referred to as a “Menu Driver” in RetroArch), and it is called “rgui”. It’s a very simple interface, and you have a wide variety of configuration options to tweak it just the way you like. To find the interface settings, go to Settings > User Interface > Appearance. Personally, I like the “Tango Dark” Menu Color Theme option.
So RetroArch isn’t meant to replace your current emulators, but to act as an alternative to them but with universal features. Personally, I have found that I prefer to play NES, SNES, and Genesis games in RetroArch, because the same hotkeys work across all the systems, and some of their filters look really nice.
Be sure to check out this blog post from Libretro which goes into even more detail about the OpenDingux version of RetroArch.
Supported systems
There are over a dozen RetroArch cores (emulators) available for the OpenDingux version. Here is a quick list of cores:
FB Alpha 2012 CPS-1 (Arcade)
FB Alpha 2012 CPS-2 (Arcade)
FB Alpha 2012 Neo Geo (Neo-Geo)
FCEUmm (NES and Famicom Disk System)
Gambatte (Game Boy/Color)
Genesis Plus GX (Genesis, Master System, Game Gear, Sega CD)
gpSP (GBA)
Handy (Atari Lynx)
Beetle PCE Fast (TurboGrafx-16/CD)
Beetle WonderSwan (WonderSwan/Color)
mGBA (Note: GB/GBC/SGB content only)
PicoDrive (Genesis, Master System, Sega CD, Sega 32x)
PokeMini (Pokemon Mini)
PrBoom (Doom)
QuickNES (NES)
RACE (Neo Geo Pocket/Color)
Snes9x 2005 (SNES)
Snes9x 2005 Plus (SNES)
TyrQuake (Quake)
VICE x64 (Commodore 64)

Newly added in 2021:
ScummVM
DOSBox Pure
Atari 2600
Atari 7200
Watara Supervision
TIC-80
Magnavox Odyssey 2

Available in the nightly builds:
MAME 2003
MAME 2003-Plus
In general, this covers most of the games you could play on the RG350 or RG280V devices. Notably, some of the games you won’t be able to play include PlayStation 1 and Amiga games. But that’s the nice thing about this RetroArch build — it works alongside the emulators that you already have installed, and it pulls from the game files you already have, too. So it’s a complement to your existing device features, not a replacement.
Install RetroArch
If you happened to follow MashTec’s video from January 2020 about an early RetroArch build for RG350, you may have some residual config files on your device, which we need to delete. Go into the media/data/local/home/ folder on your internal card and if you see a directory named “.retroarch”, just delete that whole folder. That way you can start over with a clean slate.
To download the new RetroArch build, head over to their Downloads Page, and grab the latest stable build for either stock or beta OpenDingux. Note that if you want the most up-to-date (but potentially buggy) version, you’re going to want to download the nightly version instead. Unzip the file, and you should see an opk file and another folder named .retroarch. If the .retroarch folder is not appearing on your computer, here are the instructions:
- Windows 10: Open File Explorer from the taskbar. Select View > Options > Change folder and search options. Select the View tab and, in Advanced settings, select Show hidden files, folders, and drives and OK.
- MacOS: Press CMD + SHIFT + . (period) to show/hide hidden files.
Next, you want to install the RetroArch opk file. This is the easy part: just drag the opk file to your media/data/apps folder of your internal card. If you don’t know how to FTP into your device to access the internal card, check out my Connection Guide. You can also put it in the (name of sdcard)/apps folder of your external card, if you’d like.
Finally, we need to actually add the files that RetroArch needs to run (cores, filters, etc.). To do this, move the .retroarch folder into the media/data/local/home/ folder of your internal card.
For certain systems, like the Sega CD and Famicom Disk System, you will want to save the BIOS (system) files in the media/data/local/home/.retroarch/system folder. These files include the following:
bios_CD_E.bin (Sega CD)
bios_CD_J.bin (Sega CD)
bios_CD_U.bin (Sega CD)
disksys.rom (Famicom Disk System)
gb_bios.bin (Game Boy)
gba_bios.bin (Game Boy Advance)
gbc_bios.bin (Game Boy Color)
lynxboot.img (Atari Lynx)
neogeo.zip (Neo Geo)
syscard1.pce (TurboGrafx-CD)
syscard2.pce (TurboGrafx-CD)
syscard3.pcs (TurboGrafx-CD)
I’ve been told that you should also keep a copy of the neogeo.zip BIOS file in the same folder as your Neo Geo roms, to ensure the widest compatibility.
Once you’re ready, start up RetroArch by finding it in the Emulators tab on your RG350 device. It will be near the bottom.


How to launch games
Once you’ve started up RetroArch, to launch a single game, you’ll want to go to the “Load Content” and then navigate to where the ROM is stored (media/sdcard/ROMS/etc). Select the game, and then choose the core (emulator) you want to run it with.
This method is a little clunky, so let’s set up Playlists instead, which are basically a listing of your game folders.


Creating playlists
In the Main Menu, go to Playlists > Import Content > Manual Scan. Within the Manual Scan options, choose the following options:
Content Directory > (your ROMs folder)
System Name > (your system name)
Custom System Name > ignore this (usually)
Default Core > (system core)
File Extensions > ignore this (usually)
Scan Recursively > ON
Scan inside archives > ON
Arcade DAT file > ignore this (usually)
Arcade DAT filter > ignore this
Overwrite existing playlist > OFF
Note that for some systems, the “System Name” can be cumbersome. For example, the Sega Genesis system name is “Sega – Mega Drive – Genesis”. In those cases, you can select System Name > Custom System Name, and then in the Custom System Name option you can name the system whatever you’d like (NES, SNES, etc). For some systems, like Neo Geo, CPS1, and CPS2, they don’t have a system name, so you’ll have to make a custom name regardless. Also, bear in mind that the system name is critical for the next step, when you make playlist thumbnails.
In some cases, it is useful to use the “File Extensions” option. For example, if your Sega CD content is organized into .bin and .cue files, you’ll want to set the file extension to “cue” (no need to write the “.”) so that way you don’t get duplicate files in your playlist. In general, if your game requires more than one file to boot, then you’ll use this function. Don’t worry about arcade or Neo Geo .zip files, leave this section blank and RetroArch will figure out the rest for you.
When scanning arcade and Neo Geo games, it’s good to load a DAT file — this will convert all of your .zip names into the actual arcade game (e.g. avsp.zip = Aliens Vs. Predator) in the playleast. This is easy: just download this .dat file from Libretro, and save it somewhere easy to access (I put mine in the media/data/local/home/.retroarch folder), and then point the “Arcade DAT file >” option to that file.
Once you’re ready, select “Start Scan”. After a few moments, you will have scanned that directory, and now when you go to the Playlists section you’ll see that directory. Repeat this step for all of the systems you want to have in RetroArch.
To delete a playlist, go to the Playlists section and hover over the playlist you want to delete, and press START > Delete Playlist. Within this submenu you can do other things, like change the default core (for systems with multiple cores, like NES, SNES, Genesis, etc).


Create playlist thumbnails
If you want to see box art or screenshots as you are navigating your menu, it’s pretty easy. There are a few fundamental rules I would recommend:
- Images need to be in .png format, and I would recommend no bigger than 300px by 300px in order to save space.
- Image file names need to match the ROM file name exactly, such as:
- Adventures of Lolo (USA).nes
- Adventures of Lolo (USA).png
- Images are stored in media/data/local/home/.retroarch/thumbnails in a folder that matches your playlist system name. So if your playlist is named “Nintendo – Nintendo Entertainment System”, name the folder that as well. If you used a custom name, like “NES”, use that instead. Within that folder, make a folder called “Named_Boxarts” and put the images there.
- Be sure to go into Settings > User Interface > Appearance and set the thumbnails to be visible. And then also go back to the Main Menu and set Configuration File > Save Current Configuration.
- If you want more information, here is the Libretro doc on the topic.
In terms of getting box art, you have two options. You can manually save them from the Libretro thumbnail library, or you could use Skraper (Windows) and pull them from the internet. Here are my instructions for the second option.
If you’re looking for the official system names found in RetroArch (in order to name your thumbnail folders), see the list below. Note that some systems don’t have official system names, like CPS1, Neo Geo, etc., so you’ll have to use a custom name for those.
Atari - Lynx
Bandai - Wonderswan Color
Bandai - Wonderswan
Commodore - 64
DOOM
Nintendo - Famicom Disk System
Nintendo - Game Boy Advance
Nintendo - Game Boy Color
Nintendo - Game Boy
Nintendo - Nintendo Entertainment System
Nintendo - Pokemon Mini
Nintendo - Super Nintendo Entertainment System
Quake
Sega - 32X
Sega - Game Gear
Sega - Master System - Mark III
Sega - Mega Drive - Genesis
Sega - Mega-CD - Sega CD
SNK - Neo Geo Pocket Color
SNK - Neo Geo Pocket

Set up cheats
Cheats aren’t pre-loaded in this version of RetroArch, but it’s very easy to add them. First, go to this GitHub page and click on the green “Code” button, and select Download Zip. Download that file, and unzip it. Inside you’ll find a folder named “cht”, and within that, a bunch of game system folders. Grab the game system folders for the systems that you want to enable cheats for, and place those folders in the media/data/local/home/.retroarch/cheats folder on your internal SD card.
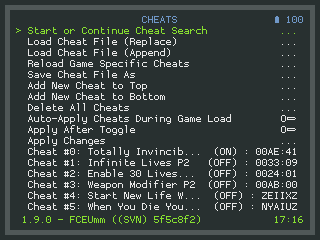
Next, boot up the game you want to apply the cheats to. Press the POWER button (or L3 + R3) to bring up the RetroArch Quick Menu, then select Cheats > Load Cheat File (Replace), then navigate to the game system folder, and scroll until you find your game (hint: press the L1 and R1 buttons to jump to the next letter of the alphabet). Select the game, and then in the main Cheats menu you’ll see a list of available cheats. Turn whatever cheat(s) you want on, then select “Apply Cheats”.
You can also set “Apply After Toggle” so they’ll just turn on when you toggle them on, and also “Auto-Apply Cheats During Game Load” so that the cheat will load when you boot up the game next time. Note that if you want to apply cheats when the game loads, you also need to go into the Quick Menu and select Overrides > Save Game Overrides so that this setting is saved.
Here are the systems that have cheats available:
DOOM
NEC - PC Engine - TurboGrafx 16
NEC - PC Engine CD - TurboGrafx-CD
Nintendo - Famicom Disk System
Nintendo - Game Boy Advance
Nintendo - Game Boy Color
Nintendo - Game Boy
Nintendo - Nintendo Entertainment System
Nintendo - Super Nintendo Entertainment System
Sega - 32X
Sega - Game Gear
Sega - Master System - Mark III
Sega - Mega Drive - Genesis
Sega - Mega-CD - Sega CD
Set up hotkeys
One of the best features of this RetroArch is that you can set universal hotkeys — no more having to memorize unique button combinations for every standalone emulator.
To set the hotkeys, open up RetroArch without loading up a game. Go to Settings > Input > Hotkeys. To start, you need to set a “Hotkey Enable”, which is the button you will push to trigger the hotkey (when used in combination with a second button). I typically use the SELECT button. Now, go to whichever function you want to have a hotkey for, and assign another button to it. This is the hotkey setup that I use:
Confirm Quit: YES
Hotkey Enable: 2 (SELECT)
Fast-forward (Toggle): 13 (R2)
Load State: 10 (L1)
Save State: 11 (R1)
Pause (Toggle): 8 (A button)
Reset Game: 0 (B button)
Show FPS: 1 (Y button)
Close Content:  3 (START)
With this setup, I can toggle fast-forward by pressing SELECT + R2, and so on. If I want to leave a game, I just have to press SELECT + START two times and it’ll close the game and take me back to the main RetroArch menu.
Once you’re happy with the hotkeys, go to the Main Menu and select Configuration File > Save Current Configuration.
Set as default launcher
Here’s a neat trick from my friend MashTec. If you’d like, you could set up RetroArch to boot up automatically when you power the device on…effectively turning this into a RetroArch handheld device. Note that this method is for the older build of RetroArch (January 2020), so you will have to rename the opk filename in the frontend_start code. Also, this method doesn’t work for the RG280V, and I assume it won’t work for the RG280M.
Updating RetroArch
RetroArch is updated nightly, and its stable version also sees updates from time to time. To update, it’s pretty simple: just download the latest nightly version and then replace the OPK and .retroarch system files with the ones found in the nightly build. This process should just update the cores and other system files, while preserving your settings, playlists, and saves.
RG350 RA Installer
Developer eduardofilo has created an excellent tool that will create individual launcher OPKs for each RetroArch core, which will allow you to launch that core directly from the OpenDingux menu. What this means is that you can use these OPKs in conjunction with SimpleMenu for a streamlined interface. To read more about this option, check out his GitHub page. Note that this tool works on both the BETA and stock versions of Open Dingux.
Sichroteph’s “DeepSleep” script
Reddit user Sichroteph has a neat method of creating a “deepsleep” function in RG350/RG280 devices running RetroArch. This method will auto-start your last game when you boot the device up. To learn how to set this up, check out this detailed Reddit post.
50Hz compatibility
The latest RetroArch builds also support 50Hz gameplay, for PAL-based games. To turn it on, go into Settings > Video > Output > Vertical Refrash Rate, and adjust it accordingly. You can save your setting through the regular configuration overrides.
A good showcase for this would be playing games using the VICE (Commodore 64) emulator, since nearly every game runs at 50Hz. One of the better NES PAL games is Mr. Gimmick, and there are also a number of SNES PAL exclusives, such as Asterix & Obelix, Cannon Fodder, The Chaos Engine, The Firemen, Micro Machines 2, Putty Squad, Sensible Soccer, Worms, and the Smurfs games. Terranigma is also a beloved action RPG that plays at 50Hz, although some people prefer to play that game with the NTSC patch for a higher frame rate.
The Sega Genesis (Mega Drive) also had some 50Hz exclusives, including Addams Family Values, Alien Soldier, Cannon Fodder, Donald in Maui Mallard, Flink, Mega SWIV, Micro Machines (all of them), Psycho Pinball, Sensible Soccer, Zero Wing, and Super Skidmarks. Sega CD also had PAL exclusives with Syndicate and Theme Park.
A note from the RetroArch developer: “The Genesis Plus GX core sometimes autodetects the wrong region. In these cases, you have to manually set it to PAL in the core options. Picodrive does not seem to suffer from this issue. Also – you have to use Picodrive for Super Skidmarks, since it is somewhat demanding, and Genesis Plus GX is a little too slow.”
Recommended per-system settings
Most of these systems will perform best when you have their settings configured just right. In this section I’m going to show you how to set your graphics settings, and then set overrides to save those settings. Overrides follow a distinct hierarchy, which is organized into three groups: Core, Content Directory, and Game.
Game overrides are specific to that game. Content directory overrides are specific to that game folder. And core overrides are specific to that core (emulator). Content directory overrides will take precedence over core overrides, and game overrides will take precedence over content directory overrides. What this means is that you can set a content directory override to apply to all game files in a certain folder, but you could also set a game override if there are certain settings you want to apply to a specific game. If you want to read more about overrides, here is the guide on them.
My recommendation is to find the setting that works best for you, and then set a content directory override so that all games in that folder (like your NES folder) will use those same settings. But then if you find a game that works better with other settings, you can create a game override for that game. To set an override, go into that game’s Quick Menu, and go to the Overrides section.
In general, these are the four settings I recommend testing for the best results:
 Settings > Video > Scaling > Integer Scale
 Settings > Video > Scaling > Keep Aspect Ratio
 Settings > Video > Image Interpolation
 Settings > Video > Video Filter
- Integer scaling is when you keep the resolution to a whole number increase for the original resolution (1x, 2x, 3x, etc). This works well with handheld systems that originally had small screens, like Game Boy or Game Gear.
- Keep Aspect Ratio is whether you want to force the core’s original aspect ratio, or if you want to stretch the aspect ratio to fit the screen. This is fairly subjective — do you prefer a true aspect ratio, or filling up the entire screen?
- Image Interpolation is the type of algorithm used when upscaling. I’m not going to pretend to understand how all that works, but the recommended settings below are what the developer recommended to me, so let’s go with that.
- Video Filter is what filter (shader) looks best for that particular system — definitely mess around with these and see which ones you like best. Note that filters are CPU-powered, so they may come at a performance cost.
To find each of these settings, start up a game, then press the POWER button (or L3 + R3) to bring up the Quick Menu. Press B until you get to the Main Menu, then go to Settings > Video, and adjust the settings there (the scaling options are under the Scaling menu). Once you have them tweaked, press B again until you get back to the Main Menu, then go to Quick Menu > Resume to verify that those are the settings you want.
After you’re good with the settings, get back into the Quick Menu, and go to Overrides > Set Content Directory Overrides. This will save those settings for every game that’s loaded from that folder. Alternatively, if you just want to save those settings for that game only, then select Set Game Overrides (and same with the Core Overrides option).
Here are the recommended graphics settings from the developer who worked on this RetroArch version. Note that the images below are borrowed from the beautiful ckau-book Batocera theme.

Game Boy
Core: Gambatte
Integer Scale: ON
Keep Aspect Ratio: ON
Image Interpolation: Bicubic
Video Filter: Dot_Matrix_3x_GB_* or Dot_Matrix_3x_Dark_Grid
In the Quick Menu > Options section, setting ‘GB Colorization’ to ‘Auto’ selects the most ‘colorful’ in-built palette for original GB games. If you select this, then it’s probably easiest to use the Dot_Matrix_3x_Dark_Grid video filter, since this works well with all color schemes.
However, the developer personally prefers to change ‘GB Colorization’ to ‘Internal’, and make use of the 127 internal palettes. On the RG350M, his favorite is ‘TWB69 – TI-83’, and there is a dedicated video filter intended for use with this: Dot_Matrix_3x_GB_TI-83_Grid. There are a few of these ‘special’ filters – the one designed for the ‘GB – Pocket’ palette is another winner. If you select a palette that doesn’t have a ‘special’ filter, you can always use the general purpose Dot_Matrix_3x filter.

Game Boy Color
Core: Gambatte
Integer Scale: ON
Keep Aspect Ratio: ON
Image Interpolation: Bicubic
Video Filter: Dot_Matrix_3x_Dark_Grid
In the core options, make sure to set ‘Color Correction’ to ‘GBC Only’ and ‘Color Correction Mode’ to ‘Accurate’

Game Boy Advance
Core: gpSP
Integer Scale: OFF
Keep Aspect Ratio: OFF
Image Interpolation: Bicubic
Video Filter: Grid2x (or Scale2x for lower resolution screens)
Pokemon Mini
Core: PokeMini
Integer Scale: OFF
Keep Aspect Ratio: ON
Image Interpolation: Bicubic
Video Filter: NONE
For this system, make sure that the internal 4x upscaling is turned on in the Quick Menu > Options section.

Game Gear
Core: Genesis Plus GX
Integer Scale: ON
Keep Aspect Ratio: ON
Image Interpolation: Bicubic
Video Filter: Dot_Matrix_3x_Dark_Grid

Neo Geo Pocket (Color)
Core: RACE
Integer Scale: ON
Keep Aspect Ratio: ON
Image Interpolation: Bicubic
Video Filter: Dot_Matrix_3x_Dark_Grid
The odd resolution of the NGP exposes a bug in the RG350’s IPU hardware scaler, causing screen wrapping. But as soon as you apply any video filter, the problem goes away.

Wonderswan (Color)
Core: Beetle WonderSwan
Integer Scale: OFF
Keep Aspect Ratio: ON
Image Interpolation: Nearest Neighbor
Video Filter: Grid2x (or Scale2x for lower resolution screens)

Atari Lynx
Core: Handy
Integer Scale: OFF
Keep Aspect Ratio: ON
Image Interpolation: Bicubic
Video Filter: Dot_Matrix_3x_Dark_Grid
A handful of games run too slowly with a video filter enabled. For these special cases, just remove the filter entirely.
Nintendo Entertainment System (NES)
Core: FCEUmm
Integer Scale: OFF
Keep Aspect Ratio: OFF
Image Interpolation: Bicubic
Video Filter: Scale2x or Normal2x
NES games really benefit from the Scale2x filter, but purists can use Normal2x. Pretty much everything runs full speed with FCEUmm, but a couple of demanding games (e.g. Lagrange Point) are too slow to run with video filters. For these special cases, you can use the QuickNES core instead (with the above settings). In fact, the QuickNES core (while being less accurate) also has a ‘fake stereo’ audio core option, which sounds fantastic – so the developer often uses it instead of FCEUmm anyway.

Super Nintendo (SNES)
Core: Snes9x 2005 Plus / Snes9x 2005
Integer Scale: OFF
Keep Aspect Ratio: OFF
Image Interpolation: Nearest Neighbor
Video Filter: NONE
The Snes9x 2005 Plus has much better audio performance than the regular Snes9x 2005, but may not play games at full speed. The developer recommends that you initially load your SNES games with Snes 9x 2005 Plus, and if it’s not running at full speed, try Snes9x 2005 as a fallback. At this point, with the optimizations the developers have been able to implement in these cores, only games that require special chips (Yoshi’s Island, Super Mario RPG, etc.) will have issues running at full speed.
Note that on the RG280 devices, “bicubic” image interpolation looks better than “nearest neighbor”.

Sega Master System
Core: Genesis Plux GX
Integer Scale: OFF
Keep Aspect Ratio: OFF
Image Interpolation: Bicubic
Video Filter: Scale2x or Normal2x
Sega Genesis (Mega Drive)
Core: Genesis Plux GX
Integer Scale: OFF
Keep Aspect Ratio: ON
Image Interpolation: Bicubic
Video Filter: NONE
Most Sega Genesis games run at quite a high resolution, which means they look great without any video filters – which is good, because the Genesis Plus GX core is very accurate, and as a consequence is too slow for filters! A few games run in low-res mode, and for these, the developer recommends using PicoDrive with the Normal2x filter + ‘Keep Aspect Ratio: OFF’.

Sega CD
Core: Picodrive
Integer Scale: OFF
Keep Aspect Ratio: ON
Image Interpolation: Bicubic
Video Filter: NONE
A lot of Sega CD games run full speed with Genesis Plus GX. but PicoDrive provides a far more consistent experience. In addition, it is plenty fast enough for video filters – so when you encounter a low-res/blurry Sega CD game, just apply the Normal2x filter + ‘Keep Aspect Ratio: OFF’.

Sega 32x
Core: Picodrive
Integer Scale: OFF
Keep Aspect Ratio: OFF
Image Interpolation: Bicubic
Video Filter: NONE

TurboGrafx-16/CD (PC Engine / CD)
Core: PCE Fast
Integer Scale: OFF
Keep Aspect Ratio: OFF
Image Interpolation: Bicubic
Video Filter: Scanline2x
A few PC Engine games run in high resolution mode, which makes them incompatible with video filters (the upscaled resolution exceeds the hardware limits of the device). For these games, just remove the filter entirely. A small number of PC Engine CD games are too slow to run with the Scanline2x filter – for these special cases, try Normal2x_Width instead. It is recommended to use CHD disk images with this core.

Capcom Play System (CPS) 1 (game list here)
Core: FB Alpha 2012 CPS1
Integer Scale: OFF
Keep Aspect Ratio: OFF
Image Interpolation: Nearest Neighbor
Video Filter: NONE
Capcom Play System (CPS) 2 (game list here)
Core: FB Alpha 2012 CPS2
Integer Scale: OFF
Keep Aspect Ratio: OFF
Image Interpolation: Nearest Neighbor
Video Filter: NONE
The CPS cores support display rotation for vertical games, but it’s quite slow – on the RG350, it’s better to set the core option ‘Rotate Vertically Aligned Games’ to false, and play them sideways (d-pad input is automatically rotated).
The CPS and Neo Geo cores now have optional frame skipping. I’d recommend leaving this set to ‘Auto’ in general – with this, most games run smoothly without crackling audio. For the really intensive games (Neo Turf Masters is one such example, oddly enough), setting frame skip to ‘Manual’ with a threshold of ’33’ produces excellent results. All the cores now have an optional low pass audio filter. This really helps to smooth out the harsh sound of most arcade games.
Neo Geo
Core: FB Alpha 2012 Neo Geo
Integer Scale: ON
Keep Aspect Ratio: ON
Image Interpolation: Bicubic
Video Filter: NONE
This is another system where the unusual resolution exposes a bug in the IPU. But if you turn integer scaling on, the problem goes away. The developer recommends selecting the UNIBIOS in the core options – you can then hold A+B+Y while booting a game to select home/arcade and region options. Also, bear in mind that Neo Geo games are *large*, and take a long time to load. Don’t be worried if everything goes black for while when launching content.

DOOM
Core: PrBoom
Integer Scale: OFF
Keep Aspect Ratio: OFF
Image Interpolation: Bicubic
Video Filter: Normal2x_Height
Quake
Core: TyrQuake
Integer Scale: OFF
Keep Aspect Ratio: OFF
Image Interpolation: Bicubic
Video Filter: Normal2x_Height
Go to ‘Quick Menu > Controls’, hit ‘Save Core Remap File’, then go to ‘Port 1 Controls’. Set ‘Device Type’ to ‘Gamepad Modern’ (so you can use the analog sticks, then swap the L1/L2 and R1/R2 inputs (so you can fire and run with the outer shoulder buttons).

Commodore 64
Core: Vice x64
Integer Scale: OFF
Keep Aspect Ratio: OFF
Image Interpolation: Bicubic
Video Filter: Normal2x_Height
The above settings assume the following core options (Quick Menu > Options): ‘Video > Zoom Mode: Maximum’ and ‘Video > Zoom Mode Crop: Horizontal + Vertical’. If you change these, you may need to remove the video filter.
Other notes:
- Atari 2600: set Keep Aspect Ratio to OFF
Changelog
06JUL2021
– added Sichroteph’s “DeepSleep” script section
30JUN2021
– added notes re: Atari 2600 and neogeo.zip BIOS
04MAY2021
– updated eduardofilo’s RA launcher description to include BETA and STOCK firmwares
02MAY2021
– added info about 50Hz compatibility
13APR2021
– added info about eduardofilo’s RA launcher
– added info about MAME cores available in the nightly builds
12APR2021
– updated to reflect OpenDingux BETA support
– added update section
30DEC2020
– added Atari Lynx bios information
24DEC2020
– published guide

Wow! Such a good guide so quickly! 10/10 work my man
LikeLike
Those BIOS files you mentioned, where do you get them? Also are these settings recommended for the RG350m?
LikeLike
Very cool..much thanks dude there goes my holiday now I’ll be playing w my rg350 all day..lol.:)
LikeLike
https://ia800600.us.archive.org/view_archive.php?archive=/28/items/retroarch_bios_pack/extract_to_sytem_folder.zip. merry Xmas frost rambler here’s a bios pack cheers
LikeLike
Thanks!
LikeLike
https://ia802809.us.archive.org/view_archive.php?archive=/35/items/OpenEmuBIOSPack/OpenEmu%20BIOS%20Pack.zip. also bios file pack…
LikeLike
The current Retro Arc menu is only available in English. Is it possible to apply fonts from other countries?
LikeLike
Can you please make a video on how to setup Retroarch to run from a front end like “SimpleMenu” or “Emulationstation” ? THanks and Great Job.
LikeLike
Dude… please don’t play your vertical arcade games unrotated. I use FinalBurnAlpha 2020-01-22 in GMenu. It works great. Set your game to -180, configure your turbo keys if you’re playing a shooter, check your fps… It’s perfect. You don’t have to scale, and it overrides the infuriating “sharpening” that the RG350 turns on every time you’re switching around. I hit power/D-pad down constantly; even in Retroarch! Does anyone know if it’s possible to permanently deactivate this?
Tate arcade is, like, 30% of what appeals to me about this device, though. These are games I can personally vouch run well.
Vert, Tate.
Arabian (83 Sun Electronics)
Commando (85 Capcom)
Congo Bongo (83 Ikegami Tsushinki Co./Sega)
Dig Dug (82 Namco)
Frogger (81 Konami)
Kangaroo (82 Sun Electronics)
KiKi KaiKai (86 Taito) ARC FDS
Psychic 5 (87 Jaleco / NMK)
Roc’n Rope (83 Konami)
Stratovox – Speak & Rescue (80 Sun Electronics)
Youjyuden – Heroic Episode (86 Irem) M62
LikeLike
Sadly nothing works for RG280v, can’t FTP into it to get any loaders to work. Doesn’t matter its RetroArch or Simple Menu.. nothing works. System is a joke! http://FTP.. no one uses this tech anymore. Should be straight plug and play. Copy stuff to a memory card and boom.. Tossed the unit in the trash! Waste of time and money.
LikeLike
how can I link RA to simplemenu? for example, Now I want GB games to run on RA gambatte core vs native gambatte app, can I link my .gb games to RA but using simplemenu frontend?
LikeLike
Thanks for always being so thorough on your articles! I am trying to install retroArch on the RG280V, but it doesn’t seem to have a IP address. Would you mind to explain how you installed it on yours?
Thanks again!
LikeLike
Latest nightly builds seems aren’t working for me on the RG350 and RG280.Everytime I try to run a game, i.e. Super Mario Bros 3 on NES, the retroarch crashes and goes back to the main menu on OpenDingux.
Do you have any suggestions how to fix this issue???
LikeLike
Hi Omar,
How did you access to your RG280 internal drive? I didn’t find the solution…
Thanks!
LikeLike
Hi Mangin
I’m using the Open Dingux Beta, which enables the USB MTP (check the guide: https://retrogamecorps.com/2020/12/05/opendingux-beta-firmware-for-rg350-and-rg280-devices/)
Like the guide says, it’s a bit temperamental as it can get disconnected sometimes in the middle of a transfer, but most of the time works well.
LikeLike
Alright! I completely forgot about that… I was trying with the stock OS. Thanks for your help!
LikeLike
Am I the only one that has the retroarch in a constant rumble while it’s running? Is there a way to fix this?
LikeLike
:: Update: Never mind, I figured it out. If anyone is having the same issue, you can turn off the rumble by going to:
MAIN MENU > SETTINGS > INPUT > HAPTIC FEEDBACK/VIBRATION
In my case, it was set to 100, I changed it to 0, then did went back to MAIN MENU and selected “Restart RetroArch”. When it came back the constant vibrate was stopped. (I may have then gone from MAIN MENU to CONFIGURATION FILE to save the current config. Anyway, if anyone has the same issue I did, here’s the work around.
Cheers,
Rh0gii
LikeLike
@Rh0gii: Many thanks for posting the solution to the problem! 🙂
I had the same issue!
LikeLike
I can’t seem to get cheats working, no matter what I do, for any system. I can get them to load, and I can toggle them on, and Apply them, but even if I save them as overrides and restart the game, they never take effect, no matter what I try! Has anyone else had this problem?
LikeLike
Any chance to load arcade CPS1 games on retroarch or opendingux beta? No way seems to work…
LikeLike
Snes cores on rg350 is very slow for me. Unplayable .
– No filters
– Snes9x 2005 and Snes9x 2005 Plus tested
– Normal firmware (no OponDingux beta)
– Tested: Fzero, Donkey Kong 1,2 and 3.
LikeLike
On the rg350 Nearest Neighbor scaling in snes games is very blurry. bicubic is fine.
LikeLike
Where can I get retroarch themes? How to make the default download of retroarch at system startup (rogue rg-350)?
LikeLike