

Last updated: 15NOV2020 (see Changelog for details)
If you’ve followed any of my previous video guides, you know that Nintendo 64 games don’t run well on the RG350 devices. Very few games even run at a speed that is considered “playable”, and even then, there are some major compromises in graphics and audio.
So that’s why I’m so excited to show off how to install a fully-functional beta port of Super Mario 64, and it works really well with all of the RG350 devices (plus the RG280 devices, too!). It’s not a super simple process (for example, you have to use the new beta OpenDingux firmware), but it’s a neat little project to unlock a feature most people never thought would be possible on these devices.
Table of Contents:
A warning about copyright
Required tools and software
Flash the base stock firmware onto your microSD card
Build the Super Mario 64 port
Place the files on your external card
Run the beta update and launch the game
Remapping the controls
Notes for the RG280V (new)

Changelog
A warning about copyright
Let’s start this off on the right foot. The game file for Super Mario 64 (or for any game, unless explicitly offered by the owner) is considered copyrighted media, just like a film or song is considered copyrighted media. While it’s never been tested in court, distributing game files over the internet is considered illegal. This guide will show you how to create your own RG350 port of SM64 using your own copy of the game, for your own personal use. Sharing the location of a copy of SM64 is not permitted on this site, nor is distributing a copy of the completed OPK/port we’re about to create. Here is a note from the developer of this port:
DO NOT REDISTRIBUTE THE OPK YOU GOT FROM THIS SCRIPT, IT’S ONLY MEANT FOR YOURSELF. YOU’RE SUPPOSED TO OWN A COPY OF SM64 AND USE YOUR COPY TO GENERATE THE OPK FILE FOR YOURSELF ONLY.
LICENSES FOR N64-FAST3D-ENGINE DO NOT ALLOW REDISTRIBUTION IN BINARY FORM, THE RESULTING OPK AND ITS INCLUDED BINARY FILE ALSO CONTAIN DATA FROM YOUR SM64 ROM DUMP, AND THUS ALSO PROHIBITS YOU FROM REDISTRIBUTING THESE FILES.
If you’re interested in reading more about the legality surrounding game emulation, check out my article here.
Required tools and software
Extra microSD card: In order for the SM64 port to run on the RG350 devices, you must use the new OpenDingux beta firmware. This beta is undergoing daily updates, and it’s getting better each day, but I would not recommend you install it over your primary internal/TF1 (firmware) SD card just yet. So my recommendation is that you use a different SD card to install the beta software and this SM64 port. You don’t need a large SD card, 16GB should work just fine, and you can usually get a good one for less than $10. For my video above, I just used one of the microSD cards that come with RG350 devices, since I have several spares lying around; they are of poor quality and prone to failure, but worked fine for this little experiment. I recommend you get a SanDisk or Samsung card for their known reliability.
Stock RG350 firmware: We’re going to flash the base firmware onto your card so that we start from scratch.
OpenDingux beta firmware: The port only works on this beta firmware, so you’ll want to download the latest release (the one labeled “gcw0”).
Your personal copy of the Super Mario 64 Nintendo 64 ROM. Make sure that you’re using a ROM with the file extension of .z64 to ensure widest compatibility. This process also supports the EU and JP versions of the ROM, but are untested at this time. If possible, use a US version of the ROM. The file needs to be renamed as follows:
baserom.us.z64for NTSC/US version of Super Mario 64baserom.eu.z64for European version of Super Mario 64baserom.jp.z64for Japan version of Super Mario 64
Your existing external (TF2) microSD card. To streamline the process, we’re going to simply place the OpenDingux beta update file and the SM64 port directly on the external card. It won’t be affected by the beta firmware in any way, so don’t worry about losing your precious game files.
Flash the base stock firmware onto your microSD card
The first thing you want to do is flash the stock firmware onto a new microSD card, so that we’re starting from scratch.
- Download and unzip the stable firmware update from the following official links below. Be sure to put the .img file somewhere easy to access, like your Desktop or Downloads folder:
- RG350 and RG350P (download the “stable” release, not the “alternative”)
- RG350M (because the RG350M has a larger screen resolution, it uses a different firmware).
- Download and install Win32 Disk Imager (PC) or ApplePi-Baker v2 (Mac), if you haven’t already. Both are free to use. This software is necessary to write the new firmware to your card.
- Create a new firmware microSD card. Insert your new microSD card into your computer.
- For Win32 Disk Imager (PC), select your upgrade .img file by clicking the folder icon under “Image File”, and navigating to wherever your stored it during Step #1. Click the “Write” button, and wait for it to write the image to your new microSD card.
- For ApplePi-Baker v2 (Mac), select your new microSD card in the “Select Disk(s)” window. Near the bottom-right of the window there are some buttons for “Options”, be sure to select the second option, which says “Expand Linux partition”. Click the “Restore” button and navigate to your upgrade .img file. The file will then write to your new microSD card, and then expand the partition, allowing you to skip the next step.
- Resize the firmware card EXT4 partition. When writing this image onto your card, it will only make a partition that’s exactly the size needed for your firmware. But you’re going to want to expand that partition so you can take advantage of whatever free space is still left on that card. Luckily, if you’re on a Mac, the ApplePi-Baker v2 software already did that when you wrote the .img file onto your new card during Step #1 above, so you can skip to the next step. For Windows/PC users, you will want to download and install DiskGenius.
- For DiskGenius (PC), open the app and find your SD card using the menu sidebar on the left (it will typically be named “GenericSTORAGE DEVICE”). You should see two partitions within that SD card: one called “Removable Disk”, and another called “Primary (1)”. Right-click on the “Primary (1)” partition, and select “Resize Partition”. You’ll now see a slider that will allow you to drag the Primary(1) box to increase or decrease its partition size (and decrease the “Keep Unallocated” box). Drag it all the way to the right (like in the picture above) so that it is taking up all the unallocated space. Click the “Start” icon and you’re all set.
Build the Super Mario 64 port
I found this to be the most fun part of the whole process. The developer of this port created an online OPK builder specifically for this port. All you have to do is visit a webpage, follow a few notes, and voilà, the builder will decompile and build an OPK from your SM64 game file. If you’d like to do it the hard way and build your own OPK by hand, here is the GitHub repository (with PC/Linux instructions).
- Head to this page to find the SM64 port builder.
- In the first “cell” (piece of code) on the page, you’ll find a “play” button on the top-left side of the code. This will download the toolchain and create the necessary file structure. The first time I ran this cell it took 20 minutes due to a slow download speed from the server, but the subsequent times only took about 2 minutes.
- On the left menu, you’ll see an icon of a folder. Click that folder icon, then the “sm64-od-port” folder. Take your renamed “baserom.us.z64” file and drag it into the sm64-od-port folder. You can click the refresh button to make sure you see it in that folder.
- Below the first cell, you’ll find another cell, that’s much shorter. It will simply say: “!cd sm64-od-port && ./build_opk.sh”. Same deal here, click on the “play” button on the left side of the code. If you get an error, there’s probably something wrong with your Super Mario 64 ROM. Use a different one.
- If all goes well, you will have a file named “sm64-port.opk” appear in the sm64-od-port folder. Download the OPK and you are done, you have a standalone version of Super Mario 64 that works on the RG350 devices.
Note that this beta has a new update that allows for analog camera controls and scaling for the RG280M and RG280V devices. Be sure to read the instructions in the link above.
Place the files on your external card
This one is super easy. Take your external (TF2) card out of the device, and plug it into your PC using a USB card reader. In the main/root folder, if you don’t have a folder names “APPS”, make one now, and put the latest OpenDingux beta OPK as well as the sm64-port.opk file in that folder. Don’t eject the SD card, because we’ll use it later.
Eject the external card from your PC and and insert it into the TF2/external SD card slot on your device. Similarly, take the SD card with the flashed firmware and insert it into the TF1/firmware SD card slot on your device.
Run the beta update and launch the game
Power on your device, and you’ll be greeted with a fresh and shiny version of the RG350 user interface. In the “Applications” tab you’ll find an OpenDingux update file (called “OS Update”). Press A to launch the updater.
The updater will verify that you want to overwrite your existing OS with the new firmware, press START to begin the reflash. Follow the prompts, and your device will restart into the new OpenDingux firmware. The first boot will take a while, but eventually you’ll see the new beta interface. Tab over to the “Games” tab and you should see the Super Mario 64 port icon. Press A to launch the game.
- The SM64 beta is only outputting to 320×240 resolution at this time, although the developer of this port is hoping to get a 640×480 version out for those with the RG350M.
- This port relies on in-game saves, like on the original console, versus save states. So you’ll need to save the game just like the old days.
- To exit the game, press POWER + SELECT.
Remapping the controls
By default, the N64 face buttons are mapped as follows:
A button (N64): A button (RG350)
B button (N64): B button (RG350)
Z button/trigger (N64): Y button (RG350)
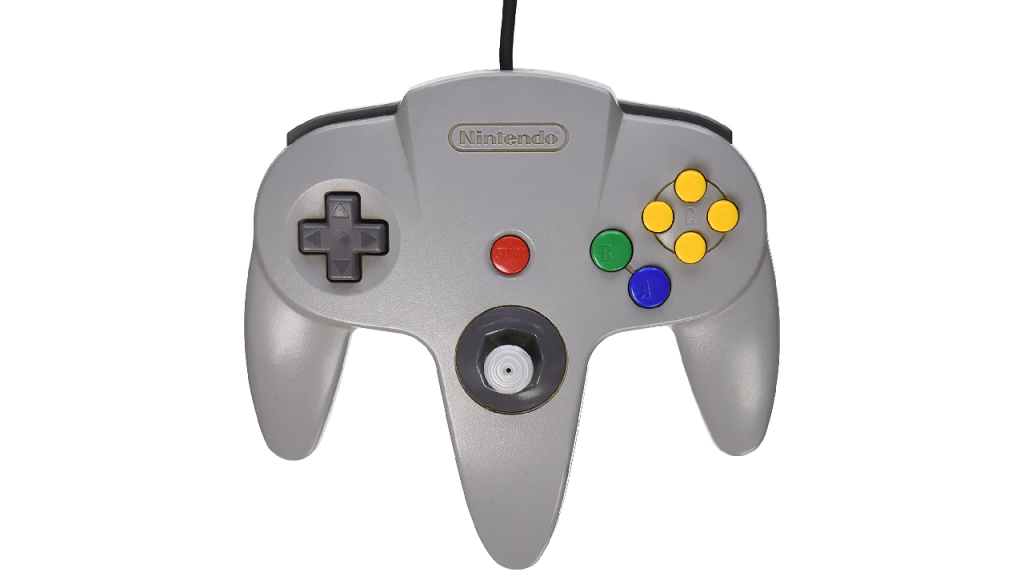
But if you look at the controller image above, you’ll see that the A button (blue) and B button (green) on the N64 controller better correspond to the B and Y buttons on the RG350 devices. Furthermore, people have offered that mapping the Z button to the RG350 R2 button makes for a more comfortable experience. So here’s how to adjust the button mapping to this configuration instead.
Once you have the beta OpenDingux firmware installed and running on your device, to to the Settings tab and open the “USB mode” app. Change the USB mode to “Mass Storage” and then press START. Plug the device into your PC via USB-C cable and Windows should recognize your device, spend a minute setting it up, and you should now see a drive entitled “OpenDingux Device”. If you open that drive you’ll see folders: Apps, Home, and Media. This, my friend, is a neat feature of the upcoming OpenDingux firmware: you can access the internal and external SD card directly in Windows!
Okay, head over to the “Home” folder, and open the .sm64-port folder. If you don’t see that folder, go to View > Hidden Items in your Windows Explorer window and make sure that the “Hidden Items” option is checked. Inside the .sm64-port folder you’ll find a sm64config.txt file. Open that up with notepad, and replace the text with these settings instead:
fullscreen true
key_a 312
key_b 42
key_start 284
key_r 14
key_z 81
key_cup 72
key_cdown 80
key_cleft 75
key_cright 77
key_stickup 512
key_stickdown 512
key_stickleft 512
key_stickright 512
Save the .txt file and you should be good to go. If you’d like to make your own button mapping, here are the what each keycode number corresponds to on the RG350 devices in the beta firmware:
L1: 15
L2: 73
R2: 81
R1: 14
A: 285
B: 312
Y: 42
X: 57
D-pad Up: 72
D-pad Down: 80
D-pad Left: 75
D-pad Right: 77
So for example, if you wanted the Z button mapped to L2 instead of R2, you would use the code “key_z 73” in the sm64config.txt file.
Notes for the RG280V
The process for loading Super Mario 64 onto the RG280V is mostly the same as above, so follow those instructions, with a few exceptions:
- When you flash the stock firmware, you will want to flash the RG280M firmware onto your new card (as opposed to the RG350 firmware). The RG280V and RG280M share the same screen, so this is the right firmware for this device.
- When creating the SM64 port in the online port builder, be sure to “uncomment” the lines that it says to in the guide itself. This will ensure you have the right aspect ratio in your RG280V SM64 port.
- By default, the d-pad buttons are mapped to the camera controls. This isn’t good for the RG280V, because there is no analog stick, which means you cannot control Mario. Instead you need to adjust the sm64config.txt file (instructions for accessing it are found in the section above) to the controls found below. Note that this will map L1 and R1 to the left and right camera functions, and will move the Mario/Koopa camera toggle function to the L2 button on your device. So essentially you will be left without the c-stick up and down controls, but everything else will work okay.
fullscreen false
 key_a 312
 key_b 42
 key_start 284
 key_r 73
 key_z 81
 key_cup 512
 key_cdown 512
 key_cleft 15
 key_cright 14
 key_stickup 72
 key_stickdown 80
 key_stickleft 75
 key_stickright 77
- Finally, if you are having trouble accessing the device via PC/Mac using the “Mass Storage” method listed above, I had the same problem. It seems like the beta OpenDingux firmware doesn’t fully support the RG280V yet. I found a workaround:
- Go to Settings > Reboot and reboot the device while holding X + Y to revert back to the stock firmware
- Connect to the device via the normal FTP method (more info here)
- Access and adjust the sm64config.txt file to the key mappings above, then save and exit
- Go to Settings > Reboot to reboot back into the beta OpenDingux firmware
One final note: don’t get into the habit of reverting back from the beta firmware to the stock firmware. Doing this several times can eventually mess both firmwares up. It’s better just to jump in this one time, adjust the SM64 controls, and then go back to the beta firmware. Hopefully the beta firmware will allow for the “Mass Storage” method soon and we won’t have to resort to this workaround anyway.
Changelog
15NOV2020
– added RG280V instructions
08NOV2020
– added note about updated beta with analog camera controls
26OCT2020
– published guide
– added keycodes for RG350 devices

Did you do any more testing with the beta firmware?
SimpleMenu seams to not be compatible, and I am in the process of finding what else.
Any workarounds that you know of?
LikeLike
Hi, unfortunately SimpleMenu won’t be compatible until someone updates it to work on the new firmware. Here is a repository of OPKs that have been updated to work on the new firmware. I haven’t tested it much yet, waiting for a more stable release before I make the official switch! https://gitlab.com/gameblabla/gameblabla-releases/-/tree/master/opk/gcw0
LikeLike
Can other N64 games be created this way?
LikeLike
Hi Dave, unfortunately no other games won’t work with this method. SM64 is unique because its source code is available.
LikeLike
Unfortunately, this is probably only going to happen for SM64, since it was fully decompiled. I don’t think they’ll be able to do the same for other games in the near future.
LikeLike
Hey i want to remapping my controller. But in my sm64config.txt file, there is nothing inside here. The size of text is also 0 byte. So what can i do for it?
SM64 game works well but i can’t remap my control setting!
LikeLike
After all this process, can I erase the opendingux update from the external sd card?
I used to connect via SFPT (using ForkLift in MacOS), the host was the same in all rg350 (10.1.1.2) and the user was root, after this process, I can’t connect the same way because it only appears user (od) but the console doesn’t give me a host. I’ve tried with 10.1.1.2 but it doesn’t work.
Thank you for this website and all the effort you put in this, it’s really helpful, have a very wonderful day, year and life haha.
LikeLike
I swapped the c_left/c_right buttons with the Z/R buttons, and switched the sides for the Z and R buttons too. It makes the jump stomp much easier:
fullscreen false
key_a 312
key_b 42
key_start 284
key_r 14
key_z 15
key_cup 512
key_cdown 512
key_cleft 73
key_cright 81
key_stickup 72
key_stickdown 80
key_stickleft 75
key_stickright 77
LikeLike
*this is for the rg280v
LikeLike
Hey Russ, I was playing through this on my 280v and I was wondering if you knew what the button value was for X or A? There’s a part in the game that you have to look up for and without the C-up button you can’t get to that part.
LikeLike
Sorry I commented before I put the pieces together! lol
LikeLike
Link above to opendingux beta firmware is dead. Anyone know where to get a copy? Can’t seem to find it in a search.
LikeLike
Any update for the PocketGo S30 Toolchain link that is broke? Created the sm64-port.opk succesfully using these instructions but have no idea how to get it on the PocketGo S30. Just need access to the google drive folder, but requests have gone ignored for months.
LikeLike